Welcome back, Apprentices! My sincerest apologies for my absence. Life tends to throw the unexpected at you and sometimes it hits you square in the face. But all is well, my friends! I've started a new job working for that company that makes that game-box-thingie and I have never been happier! My work schedule is finally settling down and I can spend more time with you lovely folks! So, let's get to it!
It's the holidays! 'Tis the season to flood into shopping malls en masse to buy your loved ones more useless crap to clutter up shelves and rooms already filled with useless crap! "But...but...who DOESN'T need more useless crap?" you ask. I know...I know...we ALL need more useless crap in our lives. But why not try something new this year?
Every holiday season, I make cinnamon pecans and give them as gifts to my nearest and dearest. I like giving treats rather than just buying stuff as gifts because I find that my friends really do appreciate it more. They appreciate the time I take to prepare them and the love I put into each and every batch. It may sound cheesy, but there you have it; I cook for the people I love to show them how I feel. And my friends look forward to these nuts every year. They're sweet with just a hint of spiciness from the cinnamon and they are like crack. Try not to start eating them because you will not be able to stop. You can put them on ice cream, salads or just sit on your couch and shove them in your face during a "Being Human" marathon on Netflix. <----- Yep...that happened.
INGREDIENTS:
3 Cups Pecan Halves
1 Cup Sugar
1/4 Cup Evaporated Milk
1 tsp. Vanilla Extract
1/2 tsp Cinnamon
GEAR:
Large Saucepan
Wooden Spoon or Heat-Resistent Silicon Spatula
Parchment or Wax Paper
Cookie Sheet
LINE a cookie sheet with parchment or wax paper and set aside.
COMBINE evaporated milk, sugar, vanilla extract and cinnamon in saucepan over medium heat. Stir ingredients until sugar is melted.
ADD the pecans to the pan and continue to stir with a wooden spoon or heat-resistent silicone spatula until the pecans are well coated and there is minimal liquid left in the bottom of the pan (about 2 minutes).
REMOVE from heat and spread on parchment or wax paper lined cookie sheet to let cool. When pecans have cooled completely store in air-tight container or put them in pretty bags and tie with pretty ribbon to give as lovely little gifts!
I hope you enjoy this recipe! Have a wonderful holiday season and I'll be back soon with some delicious baked Andouille Corn Pups!
POINTS:
+10 Kitchen Savvy for Holiday Cooking!
If you like the blog, don't forget to like us on Facebook and follow us on Twitter!
Welcome back, Truebies! This is part 3 of 3 posts to celebrate the return of our favorite bunch of Vamps, Weres, Telepaths, Fairies & misguided sexual deviants from the deep, deep South, True Blood! We've made a delicious basket of deep fried amazing-ness as a main course, a boozy concoction to get you pleasantly drunk while watching Billith and his mutant fangs reign down awkward, religious terror on the poor minions of Bon Temps - and now, we have dessert!
Ambrosia Ice Cream with Pecan Pralines & Vanilla Pizzelles
Ambrosia is a salad commonly served in the South. It consists of cherries, oranges, pineapple, coconut and various creamy bases all mixed up with miniature marshmallows. It reminds me of old Southern ladies in giant, floppy hats and floral print dresses and hot summer days. And it's the dish people bring to pot-lucks when they don't feel like putting in a whole lot of effort. You know that guy. You might have been that guy. The following dessert requires just a little more effort but it's still fairly easy to achieve. So, let's get started!
Pecan Pralines
2 Cups Pecan Pieces 1/4 Cup Packed Brown Sugar 1/4 tsp Vanilla Extract 4 Tablespoons Heavy Cream Pre-Heat Oven to 350º Line a baking sheet with parchment paper.
Combine all ingredients in a bowl and mix well. Using a spatula, evenly spread the pecan mixture on the parchment paper in a single layer (no piles).
Bake for 10 minutes, remove from oven and stir. Bake for another 10 minutes (for a total of 20 minutes) or until the coating is dry.
Let cool and store in an air-tight container. You'll only need 1 cup for the ice cream but you can eat these delicious pralines plain, add them to cereal or sprinkle on your pancakes and waffles. Delicious!!
Basic Vanilla Pizzelles 3 Eggs 3/4 Cup Sugar 1/2 Cup Melted Butter 1 Tablespoon Vanilla Extract 1 3/4 Cup Flour 2 TSP Baking Powder Pre-Heat Pizzelle Press to Medium Setting In a large bowl, beat together the eggs and sugar until thick. I recommend using an electric hand mixer to make life a little easier. Stir in the melted butter and vanilla.
In a separate bowl, sift together the flour and baking powder. Using a spatula, gradually blend the flour in with the egg/sugar mixture until a smooth, thick batter forms.
Spoon batter into Pizzelle press and cook for 25-45 seconds or until you achieve the desired shade of golden-brown goodness!
Ambrosia Ice Cream
2 Cups Heavy Cream 2 Cups Whole Milk 1 Tablespoon Vanilla Extract 1/4 TSP salt 1 Cup Sugar 1/4 Cup Coconut 1/4 Cup Chopped Mandarin Oranges (canned) 1/4 Cup Drained Crushed Pineapple (canned) 1/4 Cup Chopped Maraschino Cherries 1 Cup Pecan Pralines In a large bowl, whisk together heavy cream and sugar until foamy. Whisk in whole milk, vanilla & salt. Cover and refrigerate for 2 hours. After 2 hours, remove from refrigerator and whisk until smooth.
Prepare ice cream according to your ice cream maker's instructions. When ice cream is at soft-serve stage (after about an hour), add fruit, pralines and coconut and mix until evenly distributed.
Serve with Pizzelles, drizzle with cherry juice and garnish with fresh mint and maraschino cherries.
*TIP I used canned fruit in this ice cream because most ice cream compressors will freeze fresh fruit to the point where eating it can nearly break teeth. Canned fruit is usually packed in a sugary syrup that protects the fruit from over-freezing and makes for a pleasant ice cream experience!
And that's the menu! I hope you enjoy these dishes as much as I did! Be sure to follow us on Twitter and like us on Facebook for all the latest 8-Bit Cook news!
Welcome back, gentle readers! In case you haven't noticed, I love themes. And I mean, I LOVE themes. If there's a way to tie together my nerdy cooking obsession with my psychotic pop culture obsessions, I am all over it like cheese on mac. And my obsession with True Blood goes back to before the very first episode ever even aired. So, what better reason than the True Blood season premiere to post a super-fun 3-parter?
And now it's time for the fun bit...the boozy part of our 3-parter. Thanks to a certain group of bat-crap crazy Lillith-loving a-holes bombing the crap out of the Tru-Blood factories of the world, I was unable to procure all the ingredients I needed for this delicious fizzy cocktail. But, when faced with adversity, I rose to the challenge and found this at my local VONS grocery store:
...and the Fizzy Fang was born! Ingredients: Your favorite Vodka Blood Orange Soda Grenadine Lime Juice (& Lime Wedge for garnish) Fresh Mint Maraschino Cherries In a glass, mix together two parts blood orange soda, one part vodka, about 1 tablespoon of lime (or to taste) and about a tablespoon of Grenadine. Garnish with fresh mint, maraschino cherries and a lime wedge.
*TIP For a more minty flavor, crush your mint in the bottom of your glass.
Simple, delicious and it gets the job done, honey. I'm pretty sure it would get the stamp of approval from Tara and Lafayette. Be sure to pop in tomorrow when we wrap things up with dessert: Ambrosia Ice Cream and delicious Italian Pizzelles! And remember, drink responsibly, kids! Follow us on Twitter and like us on Facebook for all the latest 8-Bit Cook news!
Welcome back! This week, we're celebrating the return of the bloodiest, nakedest, Southern twangiest vampire show on television today: True Blood! Today, we're paying tribute to everyone's favorite back-water bar and grill, Merlotte's, with a fry basket good enough to make Lafayette blush. You ain't gonna see nothin' green but the garnish here, honey. So, brace your arteries, fire up that stove and get out that cast iron skillet because we're gonna bread and fry everything but the coffin!
What's in the basket? Well, we have fried chicken strips, fried shrimp, french fries and hush puppies. Don't know what a hush puppy is? Don't panic, it's fried cornbread! Once they clean up the fairy after-birth, I'm pretty sure you'll be able to order something very similar to this in Merlotte's. In this blog, you'll find the recipes and basic instruction for each item in the basket. In later posts, I'll elaborate on technique for those of you in need of more detailed instruction and break each item into a quest for those of you following along with your character tomes.
Basic Fried Chicken Strips 4 Boneless Skinless Chicken Breasts Cut Into Strips Vegetable or Peanut Oil for frying 2 Cups Buttermilk 3 Cups Flour 1 TBS Ground Pepper 1 TBS Salt 1 TBS Onion Powder 2 TSP Cayenne Pepper In a shallow dish, soak your chicken in the buttermilk, cover with plastic wrap and refrigerate for at least two hours.
Pre-Heat Oil in a heavy duty skillet (ie. cast iron) or dutch oven to 350º Do not fill the skillet more than halfway with oil; too much becomes dangerous.
Mix together flour, pepper, cayenne pepper, salt and onion powder in a large bowl. Trust your nose! Smell the mixture and if you feel like it needs more seasoning, don't be afraid to add it!
Transfer pre-soaked chicken strips directly from buttermilk to flour mixture and coat well. For a thicker, crunchier breading, coat again in buttermilk and return for a second time to flour mixture.
Fry chicken until golden brown and crunchy, roughly 8 to 10 minutes. Make sure you turn the strips over halfway through cooking. Do not cook more than three strips at a time. Overloading the oil will drive down the temperature and effect the cooking time and greasiness of your chicken. Transfer to a baking sheet lined with paper towels to drain grease.
Crispy Fried Shrimp 1 Pound Uncooked Shrimp, peeled & deveined Vegetable or Peanut Oil for Frying 1 Cup Buttermilk 2 Tsp Tabasco Sauce 1 Cup Self-Rising Flour 2 TBS Cornmeal 1 Tsp Salt 2 Tsp Ground Pepper 1 Tsp Onion Powder Pre-heat Oil in skillet or dutch oven to 350º Whisk together buttermilk and Tabasco sauce in a shallow dish. Mix together self-rising flour, cornmeal, salt, ground pepper and onion powder in a separate dish. Rinse shrimp and pat dry with paper towels. Dredge shrimp FIRST in flour mixture, then transfer to buttermilk mixture and coat well. Return shrimp to flour mixture and set aside until all shrimp are breaded.
Fry until crispy and golden brown in small batches, roughly 5 minutes per batch. Be sure to turn the shrimp over halfway through cooking. Transfer to a paper towel lined baking sheet to drain grease.
Hush Puppies
3/4 Cup Self-Rising Cornmeal (or 3/4 Cup regular cornmeal + 1 tsp baking powder) 1/2 Cup Self-Rising Flour Vegetable or Peanut Oil for frying 1/4 Cup minced onion 1/2 Cup Creamed Corn (canned) 1 Large Egg (beaten) 1 tsp salt 1 tsp ground pepper In a skillet or dutch oven, fill a little under halfway with oil. Pre-Heat Oil to 350º Mix together all the ingredients in a bowl until a smooth, thick batter forms. Let it stand for about five minutes
Carefully drop spoonfulsof batter into the hot oil. A good rule of thumb is not to go over a tablespoon per hush puppy. Fry in batches of 5 or 6. Again, overloading the oil will drive down the temperature of the oil and effect cooking time and greasiness. Fry until golden brown and crunchy, roughly 3 to 4 minutes. Be sure to turn the hush puppies halfway through for even cooking. Transfer to a paper towel lined baking sheet to drain grease.
French Fries
5 Pounds Russet Potatoes
Vegetable or Peanut Oil for Frying
Salt & Pepper to taste
Large bowl of cold water
Peel and cut potatoes into sticks.
Transfer potato sticks to bowl of cold water and let soak for at least 2 hours. Why? Well, soaking the potatoes (fries) in cold water gets rid of a lot of the starch and helps achieve delicious, crunchy french fries. You can soak them all night if you feel like it. But I recommend at LEAST 2 hours. Also, if your water isn't cold enough, add ice cubes and stick it in the fridge.
Remove from bowl to a paper towel lined baking sheet and pat dry, removing any excess water.
Get ready! You're going to fry these bad-boys twice for maximum crispy deliciousness!
Pre-Heat Oil to 300º in a deep skillet or dutch oven
In small batches, fry potato sticks until tender. Test them with a metal spatula or knife. When you can easily slice through a stick, pull them from the oil and transfer to a paper towel lined pan. Pat away the excess grease with a dry paper towel. Repeat until you have lightly fried the entire batch.
Increase oil temperature to 375º
Again, in small batches, fry the potato sticks until golden brown and crispy. About 4 minutes. Transfer to a paper towel lined baking sheet to drain the grease. Season with salt and pepper or other seasonings (garlic, cayenne, onion powder, etc.).
And that's the fry basket in a nutshell! Don't fix it too often or you might find yourself wheezing the next time you're running from a hungry vampire. Be sure to pop in tomorrow because I'll be posting my special True Blood cocktail, the Fizzy Fang. And Friday, we're turning a traditional Southern salad on its head with Ambrosia Ice Cream!
Be sure to follow us on Twitter and like us on Facebook for all the latest 8-Bit Cook news!
Welcome back, Apprentices! Today, we're taking a break from the kitchen to talk about one of my favorite subjects: Doctor Who!
It was confirmed on Saturday by BBC that the 11th Doctor, Matt Smith, will soon leave us in this year's Christmas special. The announcement has spawned all sorts of reactions from fans across social media ranging from understandable sadness and confusion (announcements from just last month had confirmed him for the eighth season) to the ridiculously childish and hostile lashing out on Twitter to impassioned debates over Steven Moffat's competency as a story-teller and show-runner. But that subject is neither here nor there for this Whovian. That debate is for another day.
In the beginning, it was difficult for me to say good-bye to David Tennant as the 10th Doctor. He was my first Doctor as we got to know each other one fateful day when I was at home, sick with the flu and BBC America was airing a second series Doctor Who marathon. I was immediately pulled in through my feverish haze and when the marathon ended, I sought out the first series and have been hooked ever since. I was a sobbing, snotty mess when Tennant left. His last words, "I don't want to go," always resonated with me because Tennant was very clear about how much he loved Doctor Who. He'd even mentioned in interviews that watching Doctor Who as a child made him want to be an actor saying,
"I can only have been three and I was just enthralled by Doctor Who. But I was quite clear that I didn't want to be a Time Lord, I wanted to be the person who played a Time Lord."
And it was obvious, in those last heart-wrenching moments, that he, David Tennant, did not want to go. But it was his time. The time comes for every Time Lord when he must surrender the mantle and regenerate into a new version of himself.
Over the past four years, I have slowly grown to appreciate Matt Smith's quirky portrayal of The Doctor. He gives him a strange mixture of youthful naiveté with his innocent, confused reactions to River Song and barely contained simmering rage on the brink of exploding all over whatever baddie was dumb enough to put The Doctor in a trap.
But most of all, I will miss his humor; the twinkle in his eye and his crooked smile as he gazes with awe and appreciation at a creature that would scare the socks off anyone else. It's hard not to smile and laugh along as he shouts "Geronimo!" and dives, head-first into the fray, saving the universe with only his sonic screwdriver in hand and his Companion at his side.
Matt Smith's incarnation has given us bow ties and fezzes and cowboy hats (oh, my!) and some of the best Companions the show has ever seen. Watching Rory grow from being an over-sized boy to The Last Centurion during his travels with The Doctor was truly one of my favorite story lines. And River Song showing him up behind the wheel of the T.A.R.D.I.S makes me giggle every time.
And although the announcement has been made and speculation has begun on who will be the next Doctor, I will look forward to watching Matt's final appearances in the upcoming 50th Anniversary Special and have my box of tissues ready for a weep-fest during the Christmas Special.
So, thank you, Matt Smith, for making me laugh, giving me a new adventure to look forward to every Saturday night and knowing how to rip out my heart and break it into a million little pieces. Best of luck as you dive into the fray of your new adventures. Geronimo, Doctor!
Be sure to follow me on Twitter and like on Facebook for all the latest 8-Bit Cook news!
Welcome back, Apprentices! Coming up this Saturday is one of the greatest holidays in the history of the Universe: ...MY BIRTHDAY! ...Oh...and STAR WARS DAY! That's right, May 4th is the day designated to come together and celebrate all things Star Wars! If you're like me, maybe you're planning an awesome movie marathon with your friends to celebrate. You've been combing the interwebs for some delicious Star Wars - themed recipes that are a little more creative than well-placed puns (Boba Feta Salad -- Whoever thought THAT one up must've lost sleep in the attempt) and making something green and blaming it on Yoda. I take a different route with my themed cooking. I like to take inspiration straight from the source. There are tons of foods mentioned in the Star Wars universe and very few of those dishes are given very detailed descriptions. To some, this is a bad thing. To me, this is room to play. After some careful research, I've put together a delicious, versatile menu that would please even the most finicky Jedi.
Noryath Meatbread What is meatbread? Who knows? More importantly, do I want to know? Noryath Meatbread is only described as a type of food from Noryath, a planet in the Nuiri sector of the Outer Rim. The Outer Rim territories are frontier planets, not widely settled and a little bit primitive. My nerd brain immediately screamed, "WESTERN PLANET!" And meatbread became bread stuffed with meat. But not just any meat, we're making pulled pork barbecue stuffed bread! But worry not! You can substitute any filling you like...use ham & cheese, philly cheese steak or turkey & stuffing with cranberry sauce (if you're vegetarian, roast up some veggies)! Holy crap! The possibilities are endless! Those Noryathians knew what the hell they were doing with that meatbread!
*TIP Prep the pulled pork the day before. The longer it sits, the better it tastes and it will mean less work on the day for more Star Wars enjoyment. Pulled Pork Barbecue
INGREDIENTS 4lb pork shoulder (bone in) 2 tablespoons smoked sea salt (or regular sea salt) 2 tablespoons ground black pepper 2 tablespoons paprika 2 tablespoons onion powder 1/2 cup water 1 bottle of your favorite barbecue sauce
Cover the pork shoulder evenly with all seasonings and place in crock pot. Pour the water in the bottom of the crock pot and cover tightly.
Cook on high for 6 hours. By now the meat should be so tender, you will be able to just shove it off the bone and pull the bone out. But be careful, sometimes smaller pieces of bone break off in the cooking process. Make sure you remove all bone and then shred the meat with a fork. Do not drain the juices!
Add the bottle of barbecue sauce and stir well. Cook on high for one more hour and let stand. We're letting the barbecue cool for the sake of the meatbread (we will be stuffing fresh bread dough and hot filling makes the dough difficult to seal closed). If you're serving the barbecue on regular buns, serve hot, straight from the crock pot.
Bread Dough Recipe makes enough for 5 rolls...you WILL have leftover barbecue. You can easily freeze your leftover barbecue in an airtight container or make extra rolls, wrap them in plastic and place in a freezer bag. Make sure you date the bag for freshness. INGREDIENTS
1 cup warm water (100º F) 1 packet active dry yeast 2 3/4 cups bread flour 1 tablespoon sugar 1 tsp salt Olive Oil Dissolve sugar in warm water and sprinkle the surface of the water with yeast. Remember not to get your water too hot or you will kill your yeast and it won't activate. When the yeast has foamed (about 5-10 minutes) gradually add flour and salt. Knead together until an elastic dough has formed and flour is completely incorporated.
Drizzle about 1 tablespoon of olive oil in a separate bowl and transfer the dough to that bowl. Turn the dough over in the bowl to coat it with the oil. Cover with plastic and let rise until doubled in volume (about 1 hour).
PRE-HEAT OVEN TO 375º
Meatbread assembly: Deflate dough with your hands and divide into 5 even balls.
On a pastry mat (or wax paper dusted with flour) press the balls of dough into rectangles. Spoon barbecue filling into the center of the dough, being careful to leave plenty of space to pull up the sides and pinch closed.
Sprinkle a cookie sheet with cornmeal and place the rolls seam down.
Place on the center rack of your oven and bake for 25 minutes or until bread is light golden brown. Use a wooden spoon and thump the bread. If the bread sounds hollow, it is done!
*Tip If you get a little juice seeping out from the bottom of the bread, don't worry. It's normal. Use a spatula to remove the rolls from the cookie sheet if they're sticking a little.
Spicy Corn Ahrisa Traditional Spicy Ahrisa is made with greens and soypro and usually served with bread. It was a popular dish served in many cafes on Coruscant in the waning years of the Old Republic. Soypro is described as a high-quality meat substitute. Assuming soypro is a variation on Tofu, these are essentially tofu meatballs. But for the sake of this recipe (and a more harmonious menu), I decided to forego the tofu for cornmeal and incorporate the bread with the Ahrisa.
INGREDIENTS 1 cup Self-Rising Flour 1 1/2 cups Self-Rising Cornmeal - If you can't find self-rising cornmeal, use regular cornmeal and add 2 tablespoons of baking powder 2 eggs beaten 5 Large Fresh Jalapeños - seeded & finely diced 1/2 cup of diced onion 1 can creamed corn 1 tsp ground pepper 1 tsp salt If you're feeling sassy, you can add 1/2 cup grated sharp cheddar cheese Oil for frying
PRE-HEAT OIL in a large pan, dutch oven or deep fryer to 350º You want about 3" of oil if you're using a regular pan instead of a deep fryer.
In a large bowl mix together all the ingredients until if forms a batter and set it aside for a few minutes.
Carefully drop the batter into the hot oil a tablespoon at a time. Try not to overcrowd the pan. Adding too much batter will drive down the temperature of the oil, lengthen the cook-time for the Ahrisa and it will come out greasy and heavy. You also need room to be able to turn the balls over for even cooking on both sides. I find the perfect number to be about five drops of batter at a time.
Cook until the Ahrisa is golden brown and crispy. Set aside on a paper-towel lined plate for excess grease to drain and place them in a warm oven until all the batter is cooked.
Dipping Sauce
1 Cup Mayonnaise 3 tablespoons Thai Sweet Chili Sauce 2 tsp Red Pepper Flakes 1/2 tsp salt 1 tsp onion powder
Mix all ingredients together, cover and refrigerate until ready to serve.
So, there you have it! Easy(ish) and delicious! I plan to do a little more experimenting with Star Wars food in the future, so stay tuned! Personally, I can't wait to see what other tasty goodness can be found in a galaxy far, far away!
May the 4th Be With You!
Don't forget to like us on Facebook and follow us on Twitter for more 8-Bit Cook news!
Welcome back, Apprentices! Holy crap! You made it to level 2! You did it, guys! All that baking, boiling, sautéing, slicing, dicing and chopping got you here! And what better way to celebrate than with a pizza party? That's right, kids, you're going to learn to make pizza from scratch today! But be warned; like bread, once you learn to make your own pizza, you realize how completely sub-standard frozen or even delivery pizza really is. You will become a pizza snob, casually thumbing your nose at greasy, tasteless pizza with cardboard crusts and freezer-burned vegetables. In this post, I'm going to demonstrate the versatility of pizza dough. We'll be making my favorite roasted garlic white pizza, cheesy pizza sticks and garlic knots!
<--- Admit it! You want this in your face!
You want this in your face, too! ---->
TIP:Make the sauce the day before you plan to make the pizza. Spreading out the work will make you less tired and the enjoyment of shoving your face full of pizza will be heightened.
ROASTED GARLIC WHITE SAUCE
*This recipe makes two batches of sauce. Cut recipe in half for one pizza. 10-15 Cloves Roasted Garlic 4 Tablespoons Butter 2 Cups Milk (whole or 2%) 1 tsp Salt 1/2 tsp Cayenne Pepper 4 Tablespoons Flour 1 Tablespoon Olive Oil Roast your garlic! Remember that post all about roasting garlic? DO THAT! Too lazy to refer back to that old quest? Fine! I'll go over it again, but only because you asked nicely. But to keep this post from getting too long, you're getting the condensed version...and you're going to LIKE IT!
PRE-HEAT OVEN to 375º
1. Peel outer skin and chop off the top 1/4 of the head of your garlic.
2. Drizzle with olive oil and sprinkle with salt & pepper.
3. Wrap loosely in tin foil, forming a tent.
4. Bake on oven-safe baking sheet for 45 minutes to an hour.
*Garlic is done when the cloves are golden and soft.
5. Peel and set aside.
Start your sauce!
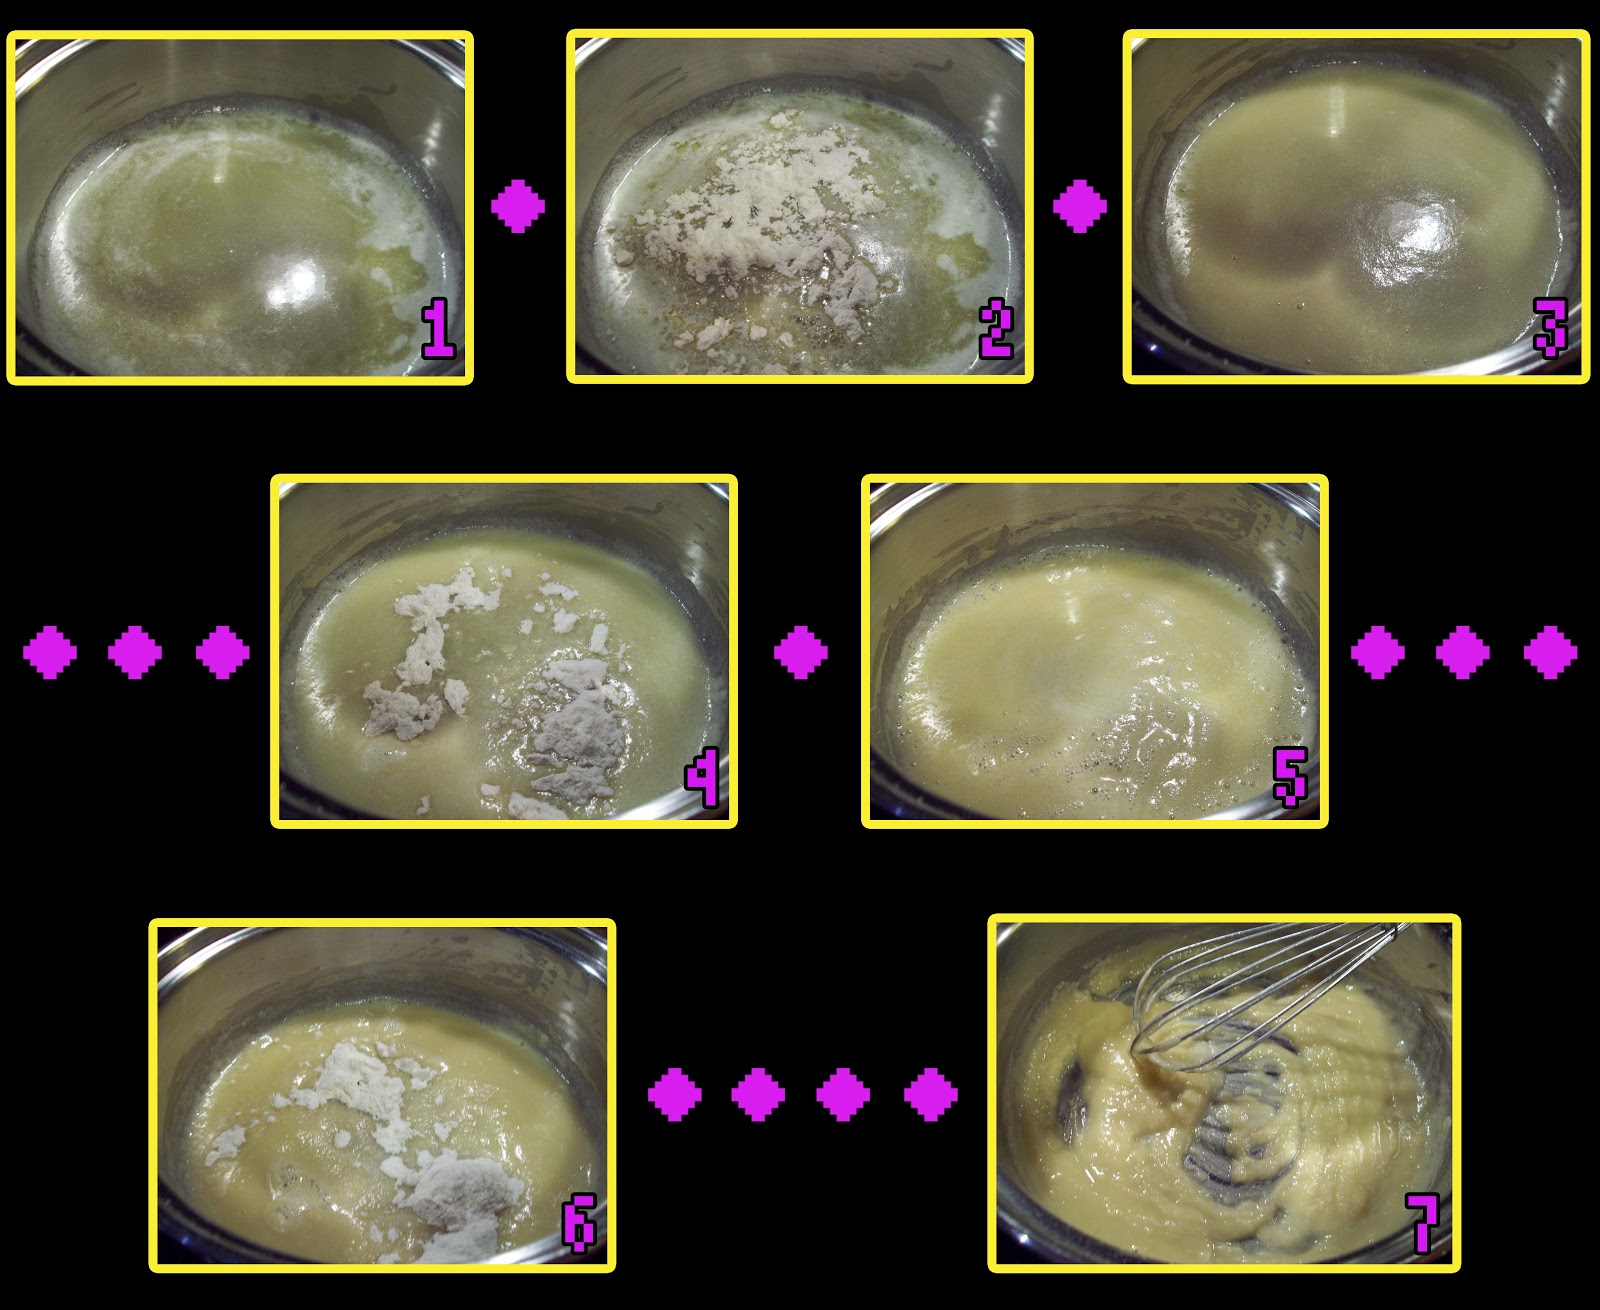
In a sauce pan, gradually warm the 2 cups of milk over LOW heat. Use a whisk and stir frequently to keep the milk from scorching.
In a separate sauce pan, melt the butter. Add two tablespoons of flour to the melted butter. Whisk the mixture well and add one tablespoon of flour. Whisk the mixture again and add the last tablespoon of flour.
Gradually add warm milk to the flour/butter mixture. Add the milk at a rate of about a 1/4 cup at a time. Whisk the mixture well as you add the milk. At this point, the mixture will start to seize up and lump together. Don't panic! That's supposed to happen. As long as you continuously whisk the mixture, the sauce will smooth out as you add the rest of the milk. But again, don't add the milk all at once. Keep it gradual and keep whisking.
*Pictured above - scary, seized up milk/flour/butter mixture and gorgeous, smooth sauce after much patience and whisking. I couldn't take pictures of all the in-between stages because it's actually a very fast process.
Add salt, cayenne and one tablespoon of olive oil. Whisk together well (I know, you're sick of the word "whisk"...it's almost over...) and let the sauce simmer over low heat for about 10 minutes or until thickened, stirring occasionally.
Pour the sauce into a food processor or blender (or use a submersion blender) and add roasted garlic cloves. Blend it together well and set aside. If you prepared the sauce a day or two before you need it, cover it well (I recommend an air-tight plastic container) and refrigerate.
BASIC PIZZA DOUGH
*This recipe makes two batches of pizza dough; enough for two 15" pizzas or one 15" pizza, plus pizza sticks & garlic knots. Cut recipe in half for one pizza.
2 Cups Warm Water 2 Packets Active Dry Yeast 4 3/4 - 5 Cups Bread Flour 2 tsp Salt 1 1/2 Tablespoons Sugar 1 Tablespoon Olive Oil 1 Cup Grated Parmesan Cheese Yellow Cornmeal
Warm water to about 100ºF. Remember not to get the water too hot or you will kill the yeast and your dough won't rise. Pour warm water in a mixing bowl (if using a stand mixer, use the mixer's bowl; if not, use a large mixing bowl) and stir in sugar and olive oil. Sprinkle the yeast evenly on the surface of the water and let the yeast foam (activate). It takes about 5-10 minutes.
In a separate bowl, measure out the flour and mix in the salt. Using an electric mixer with a dough hook, gradually add the flour/salt to the water/yeast mixture to form a smooth, elastic dough. *If you don't have a mixer, use a heavy duty spatula or wooden spoon. As the dough begins to thicken use your CLEAN hands to work the dough until smooth.*
Remove from the mixing stand. Add the parmesan cheese and work the dough with your hands until the cheese is evenly distributed throughout the dough. Drizzle a large bowl with olive oil and transfer the ball of dough to that bowl. Turn the dough over in the bowl, coating it with a thin layer of olive oil.
Cover with plastic and let rise until doubled in size. About 1 hour. Using your hands, deflate the dough and divide the dough in half.
For the sticks & garlic knots, sprinkle a large cookie sheet evenly with cornmeal. The cornmeal prevents your pizza crust from sticking to the cookie sheet and helps in creating a firmer, crispier crust.
For pizza sticks and garlic knots, divide one ball of dough in half again (you should now have three balls of dough; one larger and two smaller balls of equal size). Using your hands, press one of the smaller balls of dough into a rectangle. Try to make the thickness of the dough as even as possible. Press it down until it is about 1/4" thick. Divide the other smaller ball into 6-8 even SMALLER balls. Roll the smaller balls into ropes (like with Play-Doh when you were a kid) and then simply form the rope into a knot.
*TIP Let the pizza dough rest for a few minutes after you push it into the rectangle shape. You may find the elastic nature of the dough has pulled the shape inwards, making it smaller. By letting the dough rest and then RE-working it into the size you want, you will minimize shrinkage before and during the baking process.
Melt 2 tablespoons of butter and using a pastry brush, coat the garlic knots with butter and sprinkle with garlic powder and a little salt. Spread the rectangle of dough with the garlic white pizza sauce, making sure you take the sauce to the edge of the crust and sprinkle with grated mozzarella cheese. It is important that you push the sauce towards the outer edge of the dough. When the pizza bakes, the heat will draw everything towards the center of the pie. You want to minimize that inwards pull and make sure the cheese and sauce are evenly distributed.
PRE-HEAT OVEN to 500ºF
*Temperature is for sticks, knots and pizza Bake on the middle rack for 12-15 minutes. Brush the garlic knots once more with melted butter and slice the rectangle into sticks.
The sticks and knots make a fantastic appetizer or a fun treat for the kids.Serve them up with some red pizza sauce to dip (I like Ragu when I'm feeling lazy and I add a little cayenne for some extra kick...you'll learn homemade red sauce in a later lesson).
For the pizza, pre-heat a pizza stone (or you can use a room temperature cookie sheet in a pinch). Sprinkle the hot pizza stone (or cookie sheet) with cornmeal and press the dough into a 15" disk.
*TIP I highly recommend getting your hands on a pastry mat. With a pastry mat, you roll the dough out on this non-slip surface and then transfer easily to the pizza stone. A pastry mat will make your life so much easier!
I spent a little time working in a pizza parlor as a kid and I learned some super-handy tips and tricks to making good pizza. After you spread out your sauce, sprinkle with a small amount of cheese. Having that little bit of cheese will give your toppings something to bond to on the bottom, keeping your toppings from sliding off your pizza and onto your plate when eating. Now, add your favorite toppings! I chose caramelized onions, roma tomatoes, roasted peppers (red & green bell peppers & jalapeños) and baby portabello mushrooms.
Bake 12-15 minutes or until the crust is golden and cheese is melted! Let the pizza sit for about five minutes before you cut into it.
You did it!! Enjoy shoving your face full of delicious pizza! In the future, we'll be doing more themed meals for True Blood and Doctor Who's50th Anniversary Special. And we'll be having more tabletop themes as we play Apples to Apples and Four Taverns!
Don't forget to like us on Facebook and follow on Twitter for all the latest 8-Bit Cook news!
Welcome back, Apprentices! Today, we're going back to my roots with a delicious and easy Tex-Mex dish called King Ranch Chicken Casserole. What is King Ranch Chicken Casserole, you ask? Well, it's basically a creamy chicken enchilada casserole with just the right amount of kick and a whole lotta cheese! Serve it up with some refried beans, spanish rice and guacamole (don't forget the margaritas!) and it is sure to please!
King Ranch Chicken Casserole
3 Chicken Breasts & 3 Chicken Thighs - Poached & shredded or 1 Whole Rotisserie Chicken Shredded 1 Can Cream of Chicken Soup 1 Can Cream of Mushroom Soup 1 Can Medium or Hot Diced Tomatoes with Peppers, Drained (Rotel or Hatch) 1 Medium Onion Corn Tortillas 1/4 tsp Cayenne Pepper 1 tsp salt 1/4 tsp ground black pepper 2 Cups Mixed Shredded Cheddar & Monterey Jack Cheeses
Prep your chicken! Remember what we did last week with the chicken fried rice? If you're using fresh or frozen chicken, do that again! Boil your chicken in a large pot for about 45 minutes until the meat is white and juices run clear. If you bought a pre-cooked rotisserie chicken at the grocery store, that's fine. I would recommend getting one seasoned only with salt & pepper or with garlic. Let the chicken cool and shred with a fork. Put it in a large bowl and set aside.
Pre-Heat Oven to 350º
Dice your onion! Using a clean, sharp knife and a cutting board, dice your onion. Don't worry about getting the pieces too pretty. It's all going to be one delicious, mixed up masterpiece of yumminess!
Mix together chicken, cream of chicken soup, cream of mushroom soup, canned tomatoes (drained), onion, Cayenne, salt & pepper. Make sure it is well combined before continuing to the next step!
Grease a 9" x 13" inch lasagna pan or a large casserole dish. Line the bottom with corn tortillas. I'm weirdly compelled to cover as much of the area of the pan as possible. You don't have to be as weird as I am. I don't recommend it at all. It makes life a little difficult. Just layer as evenly as possible.
Layer 1/2 the chicken mixture on top of the tortillas and distribute 1/2 the cheese evenly on top of the chicken mixture. Repeat, creating a second layer. You should have just enough mix and cheese for 2 nice layers in a lasagna pan.
Cover with foil and bake for 30 minutes... remove foil and return to the oven for another 20-25 minutes or until cheese is melty and bubbly.
When done, be sure to let the casserole rest for about 10 minutes. I know, it's torture. But if you cut into it right away, all those gorgeous layers are going to spread. So, take that time to mix up some margaritas, do a shot of tequila or just stand over the pan and drool.
See! I told you it was easy! We'll revisit Tex-Mex casseroles again in the future. I have an insanely delicious Taco Casserole that I learned to make when I was a freshman in high school and I still make it to this day! We'll also explore burrito bowls, carnitas and maybe we'll even make some tortillas from scratch just for shits and giggles!
POINTS:
+5 Dicing
+5 Baking
+5 Boiling (If you took the time to poach your chicken)
Don't forget to like us on Facebook and follow on Twitter for all the latest 8-Bit Cook news!
Welcome back, Apprentices! Today, we're taking a break from the kitchen so I can share with you some of my favorite web series! But don't worry because tomorrow we'll be back with one of my favorite Tex-Mex recipes, King Ranch Chicken Casserole! YUM!
The internet is truly the new frontier for entertainment. With technology and quality equipment so readily available, anyone with a good idea, a lot of talent and a boatload of passion can make a web series. Don't get me wrong, anyone can make a web series but not just anyone can make a good web series. There is some truly mind-blowing talent on the internet creating everything from cooking, gaming and DIY shows to dramatic, comedic and Sci-Fi series good enough to rival anything in theaters or on television. So settle in and get ready to lose (more) hours of your life to the internet because these are my favorite shows!
The Guild
Where better to start than at the beginning? The Guild was the first web series to really capture my attention. Written and produced by Felicia Day (Buffy the Vampire Slayer, Dollhouse, Dr. Horrible's Sing-Along Blog), The Guild centers around main character Codex (Felicia Day) and her MMORPG guild-mates. In-game relationships cross over into reality when Zaboo (Sandeep Parikh), a guild-mate with a crush, tracks Codex down in real life, proclaims his devotion and moves into her apartment. Codex organizes a meeting with the rest of her guildies to try to convince Zaboo to go home to his mom. In spite of his creepy, cyber-stalkery ways, Codex begins to sympathize with Zaboo and the guild relationships evolve into real friendships. The Guild has 5 seasons under its belt and is available to view on YouTube and Netflix.
A Simple Walk Into Mordor
If you're a Lord of the Rings fan, you know the filming locations for the three epic movies are all located on the two islands that make up the country of New Zealand. Two fans, Chris and Kerry, decided to make the trek on foot, Fellowship-style, from Matamata (the location for the Shire) to Mt. Ngauruhoe (the double for Mt. Doom). A Simple Walk Into Mordor is the five-part documentary of their adventure. Armed with backpacks, cameras and one seriously hot Kiwi guide, the boys set out to cast the cursed Ring into the flames of Mt. Doom (or dig a shallow hole and bury it...whatever works, right?). The documentary is funny, sweet and at times, a little bit gross (for the record, blisters do not pop like bubblewrap and are not nearly as fun!).
So, check out the Rooster Teeth channel on YouTube and subscribe (it's FREE!) for all 5 episodes and more great, original content!
TableTop
Who wants to sit around and watch (almost) total strangers play tabletop games? When the Geek & Sundry network announced this show as part of their debut lineup, I asked myself that same question. And then I watched the first episode and was instantly hooked. Hosted by Wil Wheaton (Stand By Me, Star Trek: TNG), Tabletop is a surprisingly fun and engaging web series with new episodes every other Thursday featuring Wil playing a new tabletop game with his friends. His guests usually consist of a variety of actors, hosts, comedians and game creators from television, movies and the internet. The majority of the guests are hilarious and fun to watch. And the competition gets real sometimes but never in a negative or awkward way. TableTop is a great way to learn about games you might not know existed and perhaps start your own tabletop night with your friends!
Be sure to subscribe to Geek & Sundry to support all their fantastic, free content!
The Lizzie Bennet Diaries
"It is a truth, universally acknowledged, that a single man in possession of a good fortune must be in want of a wife." - Pride & Prejudice
The Lizzie Bennet Diaries is a unique modern adaptation of the classic Jane Austen novel Pride & Prejudice. Using a single camera, video diary filming style, we follow the adventures, love and heartache of our heroine Lizzie (Elizabeth) Bennet, her sisters and her friend, Charlotte. Of course, the relationship most viewers focus on is the epic romance between Elizabeth Bennet and Darcy. Although Darcy in the web series pales in comparison to Colin Firth's version of Darcy in the 1996 BBC production and it seems almost unfair to compare the two. So, we won't. Or we'll really, really try not to. The love story is still very sweet and fraught with humor, misunderstanding, a little bit of drama and whole lot of passion. The Lizzie Bennet Diaries may not have the best acting in the world, but Ashley Clements (Lizzie) holds her own and does justice to the classic character. Once I started watching, I got completely wrapped up in the heart of the story. In spite of the fact that I'd read the novel and seen almost every version of P&P ever produced, I still found myself tuning in twice a week for new episodes. And the idea of using a web series to expose new generations to classic literature is fantastic. One can only hope that someone was inspired to pick up Austen's book and get lost in the manners, humor and romance of Pride and Prejudice.
Chris Hardwick's All-Star Celebrity Bowling
I'm terrible at bowling...really, truly awful. So, why would I want to watch bowling on The Nerdist YouTube channel? Because it's AMAZING, that's why! Chris Hardwick (AMC's Talking Dead) is a borderline professional bowler (his father was an actual pro bowler) who invites celebrity guests to bowl for charity against him and a rotating roster Nerdist team. The odds are usually stacked against the celebrity challengers and they rarely ever pull out a victory. But the show is laugh-out-loud hilarious with celebrity guests from shows like Mad Men,The Walking Dead, Breaking Bad and Doctor Who. Subscribe to the Nerdist Channel for a huge variety of fantastic free content and "Go bowling sometime, you guys!"
My Drunk Kitchen
You're not going to learn how to cook watching this show. It just isn't going to happen. But I don't watch for the cooking tips, I watch for the laughs. The premise is actually quite simple; girl sets up camera, girl gets drunk, girl attempts to cook and sometimes the food is edible. Hannah Hart is adorable, charming and insanely funny as she mixes cocktails and cuisines while dishing up a buffet of delicious puns (see what I did there?). My Drunk Kitchen is my go-to when I'm having a rough day or feeling down. One episode can brighten my day and change my outlook on life. Be sure to subscribe to Hannah's YouTube channel, MyHarto, for more drunk cooking shenanigans!
Noaksey
Meet my friend, Dean, aka Noaksey. Self-proclaimed fool and gamer, Noaksey posts his video game play-throughs on his YouTube channel. From classic games to the newest 3D graphics extravaganzas, watch Noaksey shoot, kick, punch, smack, hack, race, chase, murder and maim his way through every digital 'verse imaginable with his trademark wry sense of humor and a charming British accent to boot! Subscribe to Noaksey's YouTube channel for more game-play antics!
Daily Grace
Grace Helbig is out of her f*cking mind...but I mean that in a good way! Grace has a five-days-a-week vlog on YouTube where she talks about anything and everything that may be on her mind. She speaks at a break-neck pace and is sometimes hard to follow. Watching her show is like watching a beautiful female Tasmanian Devil tear through a boutique full of delicate lacy underwear. She's a whirling dervish of wit, sass and confusion. You just have to step back and wait for the dust to settle. Her quirky sense of humor and seemingly stream-of-consciousness approach to vlogging makes her unique and super-fun to watch in the land of online video-diaries. Subscribe to Grace's YouTube channel for more Daily Grace!
MetaDating
Hosted by pro gamer Sean Plott (known online as Day[9] ) and game designers Sean Bouchard and Bill Graner, MetaDating explores romance and dating in the world of video games. During a live-stream session, the two Seans and Bill play a dating/romance-based game, have a few drinks and try to make the characters in the games fall in love, usually with some pretty hilarious results. My favorite episode has the boys playing a game called Facade. The in-game dialogue and interactions are insanely funny as they interact with a married couple named Tripp and Grace. But they must tread lightly because they can set off a firestorm of an argument and drive the couple to divorce. It is extremely entertaining to watch the boys gleefully ruin the NPC's marriage and then go back for more. There are eight fantastic episodes of MetaDating and Geek and Sundry has not announced plans for another season yet. But my fingers are crossed for more!
Vaginal Fantasies
I love trashy romance novels. The trashier the better. And what could possibly make a trashy romance novel even better? Answer: if it was a PARANORMAL trashy romance novel! And now, finally, there is a book club for me! Hosted by Felicia Day, Bonnie Burton, Veronica Belmont and Kiala Kazabee, Vaginal Fantasies is a regular hangout that happens every third Tuesday of the month and a book club with an enormous community on GoodReads. Ghosts, demons, zombies, succubi and all manner of supernatural creature engage in hot, sweaty monkey love and solve a little bit of mystery or something...I'm not sure what. We're focusing on the sexy time, guys. During the monthly hangouts, we have a few drinks, discuss the book and cast the characters with actors we imagine would fit the part. The discussion is engaging and funny and anything that encourages people to read (especially trashy romance novels) is good in MY book. <--- yeah, that just happened... Subscribe to Geek and Sundry for more Vaginal Fantasies!
So, those are a few of my favorite online shows. A lot of people use YouTube to watch music videos, cat videos, videos of the latest idiot making a fool of him/herself on the evening news or clips from Saturday Night Live. And that's great.But YouTube also has a whole community of incredibly talented people making amazing original content just because they're passionate about it. And occasionally, if you're lucky, as a viewer you're going to find something you are just as passionate about watching.
I'm sure I'll be posting more amazing stuff that I love in the future. And if you watch something you want to share with others, post it on my Facebook page or in the comments below!
Don't forget to like us on Facebook and follow us on Twitter for all the latest 8-Bit Cook news!