Thursday, March 28, 2013

Game of Thrones: A Meal For Kings

Welcome back, Apprentices! Today we're cooking up the perfect meal for that Game of Thrones premiere. If you're just watching it alone or hanging out with some friends, this meal takes you back to basics with a delicious honey-roasted chicken, roasted veggies, Easy Dragon Tail Bread & a rustic apple tart! Serve it all up with a cold glass of mead and you'll feel like it came from the kitchens of Winterfell! So, fire up that oven and get ready to make a meal fit for Kings! ...unless you're that little twerp, Joffrey, and then you should only get a nice serving of punch-to-the-balls!


This meal may sound like a lot of work but if you plan everything out just right, it's actually quite easy. I recommend preparing the apple tart the day before and storing it in the refrigerator unbaked. It spreads out the workload and allows you to still have a delicious fresh-baked tart on the day without doing all the work that day.

I also included two ways to make Dragon Tail Bread. One easy way with pre-made dough. And the from-scratch way for you over-achievers out there!

So, let's get started! 

Let's begin with the apple tart. This way, you can put it together and stick it in the fridge until you're ready to bake it.

Rustic Apple Tart


2 tablespoons unsalted butter
1/4 cup packed brown sugar
2 tablespoons granulated sugar
8 cups of your favorite type apple slices (peeling optional)
3 teaspoons fresh lemon juice
1 teaspoon ground cinnamon
1/4 teaspoon ground nutmeg
1 pre-made refrigerated pie crust
1 teaspoon granulated sugar
1 tablespoon apricot preserves
1 teaspoon water


In a large skillet, melt together the butter, brown sugar and 2 tablespoons of sugar. Using a fork or a small whisk, stir until the sugars dissolve. 


Stir in apples, lemon juice, cinnamon & nutmeg. Using a wooden spoon or heat-resistent, silicone spatula, stir the apples until well coated in butter-sugar mixture. Reduce heat and cover. Let it simmer for about 25 minutes (stirring occasionally) or until the apples are tender. 


Line a cookie sheet with parchment paper or spray with non-stick cooking spray (Pam). Roll out the pre-made pie crust and arrange cooled apple slices in the center, leaving a 2" border around the edge. Fold the edges up and pinch together at regular intervals until the dough forms a sort of bowl. 


In a small bowl, mix apricot preserves and 1 tsp of water. Microwave (yes, they had microwaves at Winterfell) for one minute until hot and bubbly. Brush the pie crust with apricot mixture and drizzle the remainder on the top of the apples. At this point, if you're going to bake the tart later, cover it completely with plastic wrap and refrigerate. 

Preheat oven to 400º and bake 45 mins or until the crust is golden brown.  


Honey Roasted Chicken

1 Whole uncooked chicken
2 Tablespoons Honey
2 Tablespoons Olive Oil
1/2 Tsp cinnamon
1/2 Tsp Paprika
1/2 Tsp Smoked Salt (Kosher Salt if smoked is unavailable) & Ground Pepper
1/2 Med onion thickly sliced
3 Springs Fresh Rosemary
1 Lime 

* Allow up to 3 hours of total time depending on the size of your chicken. 

Prep your chicken! Remove the giblets from the cavity of the chicken. This is the grossest part. If you have never done this, you'll need to shove your hand into the belly of the chicken and pull out the liver, heart, gizzard & neck. If you're extremely lucky, the butcher would have placed everything in a sealed bag. I was not that lucky. Once removed, rinse your chicken inside and out.  Place the chicken in a roasting pan with a rack in the bottom.  

Season the inner cavity of the chicken with smoked salt and pepper. Slice lime and onion into wedges and place them into the cavity with the sprigs of rosemary. 


Mix together honey, olive oil, cinnamon, paprika, salt & pepper. Brush the chicken with 1/2 the honey mixture.


TIP* Use butcher's twine to truss up your chicken legs. It keeps the legs close to the bird and helps it cook more evenly. I ran out of butcher's twine for this project so I didn't use it. It's not 100% necessary, but it's helpful.

Pre-heat oven to 350º and place a rack in the center of the oven. Roast chicken for 30 minutes, remove from the oven and brush with the remaining honey mixture. Return the chicken to the oven and roast for another hour. Larger chickens take longer so test the chicken with a meat thermometer and look for internal temperatures around 165-170°F for the breast and 180-185°F for the thigh. Chicken is done when the juices run clear, not pink. The skin should be dark and crisp.


My bird had a bum leg when he got out of the oven but he still tasted delicious!


Roasted Vegetables

6 small red potatoes (cubed)
4 carrots (peeled and sliced)
2 Zucchini (sliced)
1 1/2 cups cauliflower
1 medium onion
Fresh thyme
Vegetable Oil
salt & pepper

This was the mix I chose. The beauty of roasting vegetables is the fact that you can choose your mix according to what you like. You can use peppers, squash, tomatoes, broccoli...whatever you like! 

Wash & chop your vegetables! Be sure to slice your carrots a little thinner and cube the red potatoes smaller. Carrots and potatoes take longer to roast where the zucchini doesn't take as long. The smaller you chop your veggies, the faster they'll roast. Place them on a baking sheet and drizzle with vegetable oil. Season with salt, pepper and thyme. 


Pre-heat oven to 350º and roast for 45 minutes to an hour or until vegetables are fork-tender (remove once during cooking and stir vegetables so they will cook evenly).


 Easy Dragon Tail Bread

1 can pre-made crusty french bread dough (Pillsbury)
1 egg white, lightly beaten
Non-stick cooking spray (PAM)
Water

Pre-Heat Oven to 350º & spray a baking sheet with non-stick cooking spray.  Carefully open the can (yes, there is a safety warning on the side of the can) and put the dough on the greased baking sheet, seam-side down.


Using a clean pair of scissors, make a diagonal cut at one end of the loaf, on the top side, creating a sort of flap. You want a fairly deep cut until it looks like this:


Now, pull the flap with the point you created up, stretching it out and then fold it back and over until it looks like this:


Repeat the motion until you have created "scales" all along the length of your "dragon tail" until it looks like this:


Beat your egg white with a fork until it loosens up. With a pastry brush, paint the raw dough with a thin glaze of the egg white. You will not use the entire amount on one loaf. You only want a light coating to guarantee a nice, golden brown finish to your bread.

Place on the center rack and bake 3 minutes. After the first three minutes in the oven, open the door and sprinkle the dough with water. If you have a spray bottle to use, that's awesome. But simply dipping your CLEAN fingers in the water and flicking the water on the loaf works fine. Why do this? Well, that little bit of water during baking gives your crust that wonderful crispness found in all flakey breads. Close the oven and bake for another three minutes. After three minutes, sprinkle with a little more water. 

Now, close the oven and bake 20 minutes or until golden brown.


If you want to be hardcore you can make your bread from scratch. My Italian Bread recipe works perfectly for this style of bread.

Dragon Tail Bread (From Scratch)

2 cups water, lukewarm
2 Envelopes Active Dry Yeast
5 3/4 cups bread flour
1 tablespoon dark brown sugar
2 tablespoons extra-virgin olive oil
1 tablespoon salt
1 egg white, lightly beaten


In the bowl of a stand-up mixer, add brown sugar to warm water and stir until dissolved. Sprinkle all of the yeast onto the surface of the water and let it sit for about 5-10 minutes or until activated (foamy).

In a separate bowl, mix together flour and salt.  I do it this way just to keep myself from getting confused while I'm mixing all the ingredients together. It's easy to lose count if you're just adding the flour from the bag to the mixer.

Once the yeast has foamed up, gradually add flour/salt mixture and blend together on a medium setting, using a dough hook attachment. Once you have combined all your flour into the mixer, drizzle with olive oil and mix until it forms a soft, elastic dough (about 5-10 minutes).

Lightly drizzle a larger bowl with olive oil and remove the dough from the mixing bowl and transfer to the larger bowl. Turn the dough over in the bowl, allowing it to be lightly coated in olive oil and cover with plastic wrap.

Let the dough sit in a warm, draft-free place until it has doubled in size (roughly an hour). Once the dough has risen, deflate the dough using your hands. Separate the dough into two balls.

Line a baking sheet with parchment paper and form the balls of dough into cylinders (loaves). Create your dragon tails as illustrated above (or simply create three diagonal cuts at approximately 45º, across the tops of the loaves for traditional Italian bread). Brush with beaten egg white.

Pre-heat the oven to 425º 

Place on the center rack and bake for 3 minutes. Open the oven door and sprinkle/spray the dough evenly with water. Close the door and bake for another 3 minutes. Open the door again and sprinkle/spray evenly with more water. Now, close the door and let bread bake for 40-45 minutes or until golden brown. Remove from the oven and whack the bread with a wooden spoon. If it sounds hollow, it's done.


Well, I hope you enjoyed this special edition of 8-Bit Cook! I hope it inspired you to try some new things for that season premiere! Remember to join the community on Facebook and follow me on Twitter for all the latest 8-Bit Cook news!


Thursday, March 21, 2013

Game of Thrones mini-MEAD Preview!

Welcome back, Apprentices! I've been busy gearing up for season 3  of Game of Thrones and I'm planning a delicious menu of roasted meats, potatoes, veggies, bread & for dessert, a delicious apple cinnamon tart! Check back next week for the full menu and instructions! But to kick it all off, I decided to do this mini post all about my very first endeavor of brewing mead.

Making booze goes back several generations in my family. My fourth great grandfather, Antonio Molina, was an Italian farmer who came to the United States from Genoa in 1773 to grow grapes and make wine on Thomas Jefferson's plantation, Monticello. The first harvest of grapes froze and shortly after that, the Revolutionary War broke out. Antonio Molina changed his name to Anthony Mullens, claimed America as his home and took up arms in the War. After the War, he had many, many children and passed wine-making down through the generations. During prohibition, my great-great grandmother made wine and corn liquor (moonshine). My great grandfather served time for "running" said moonshine. And my grandfather brewed his own beer in the basement of his old house in Texas. Unfortunately, neither my mom nor my aunt took up brewing so the skills were lost. But who knows? If this turns out well, I might experiment a little more in the future!

ENOUGH about me! On to the MEAD!

In spite of the generational love for brewing in my family, I have not yet gathered the courage to get too complicated with it on my own. So, I bought a kit from Ambrosia Farm. The kit is only $10 (free shipping) and comes with an envelope of pre-measured flavor, yeast, a piece of muslin and a rubber band. I chose the classic Spice Mead for this particular event. The Spice Mead has ginger, cinnamon and nutmeg. When you first open the envelope, you get a nose-ful of flavor. Seriously, it smells AMAZING!


All you need is a gallon of spring water and 2 pounds of honey. The directions that come with the kit are very detailed, outlining the process very clearly in 17 steps. I know it sounds like a lot but it's really not that bad. Of course, I say that now...I might have completely screwed something up. I guess I'll find out when I taste it. But according to the directions, as long as you can boil water, you can have mead in 7-14 days! So, I hope you mastered that Boiling Water quest because you're gonna need it!

Sadly, I didn't take pictures of the process. It seemed a little redundant since this isn't a complete lesson and I want you to carefully follow the directions from Ambrosia Farm (if you decide to try it, that is). But here's a picture of my jug of mead-in-waiting.


I'm storing the bottle in the safe darkness of my guest room closet. It's important to keep it in the dark and in temperatures between 70ºF-90ºF. I'm not gonna lie...it looks a little dodgy. But once it ferments and I run it thru a sieve, it will be delicious, spicy mead fit for the King of the North!

Remember, guys, cooking is FUN! Get creative in the kitchen and don't be afraid to try new things!

Don't forget to join the community on Facebook and follow on Twitter for all the latest 8-Bit Cook news!


Thursday, March 14, 2013

Goulash & Gloom!

Welcome back, Apprentices! Today, we're starting a new regular feature on the blog inspired by the wonderful Felicia Day and her YouTube network, Geek & Sundry please subscribe and support their amazing free content! Felicia Day has proclaimed March 30th International Tabletop Day! Check out what events will be happening near you and set aside that XBOX and headset for a day to play games with your friends in person, practice those social skills and have a blast!

So, every other week, my friends will gather at my house where we'll play a new tabletop game and I will prepare a meal themed with that game. This week, the game was Gloom.


"The world of Gloom is a sad and benighted place. The sky is gray, the tea is cold, and a new tragedy lies around every corner." If you have a slightly morbid sense of humor and a great imagination, Gloom is the game for you! Each player is in charge of an eccentric family and your goal is to make them as miserable as possible before finally killing them off. Simultaneously, you are doing your best to make your opponent's family as happy as possible. The game ends when every member of one family is dead and the player whose family has the lowest self-worth, as tallied on the cards, is the victor! If you want to learn a little more about how to play Gloom, check out the show Tabletop hosted by Wil Wheaton as he and his guests play a delightfully dark round of misery and misadventure.

The cards are beautifully designed on transparent plastic allowing you to layer each action card on top of the character cards. The artwork is unique and funny and helps you to easily slip inside the world of Gloom and weave the most fantastically dark and twisted tales. Visit the Atlas Games website for ideas on how to throw your own Gloomy Gala. They offer free downloads for party invitations and guides for decorations, snacks and party favors!

On to the food!

American Gothic Goulash

1 1/2 Pounds Ground Beef or Turkey
1/2 Pound Large Elbow Macaroni
1 Medium Onion Diced
1/2 Green Bell Pepper Diced
1 Tbs Vegetable Oil
1/2 Cup Chopped Baby Portobello Mushrooms (optional)
2 Cloves Minced Garlic
1 Tsp Salt
1 Tsp Paprika
1/2 Tsp Ground Black Pepper
1 Jar of Your Favorite Spaghetti Sauce (I like Classico's Tomato Basil)
1 Cup Shredded Cheddar Cheese


First, prep your veggies! This is a very simple recipe. The most time consuming part will be all the chopping you need to do. Remember, Apprentices: use a clean, sharp knife and a clean cutting board! As gloomy as this game can be, you want to feed your friends goulash, not little bits of your own fingers. And be sure to WASH your veggies thoroughly before chopping them. Safety first!


In a large skillet, preheat 1 Tbs of vegetable oil.  When the oil is hot, sauté your chopped onion and green pepper until the onion is shiny and nearly transparent and the green pepper is tender.  Keep your burner at a medium high heat to nicely sauté without burning. Sautéing the onion brings out a little of the natural sweetness and adds some extra dimension to the flavor of the finished product.


Cook your macaroni! Time to start your macaroni. I find the best time to start the water boiling is when the onion and peppers are cooking. The timing usually works out pretty well with your macaroni finishing up around the time your meat has browned (which is the next step). Anywho, remember that quest a couple of months ago all about how to cook pasta without turning it into a gooey, gummy mess? Well, put those skills into action cook that macaroni! Remember, once the water is boiling and you add the pasta, 9 minutes is your magic number. The kitchen timer is your friend so USE IT! Drain the macaroni when it's finished, set it aside and cover it.

Add your ground beef (or turkey) & chopped mushrooms to the skillet with the onion and peppers. Break the meat into small pieces and mix together well with the onion, peppers and mushrooms. Add salt, pepper, paprika and garlic. Cook until the meat is brown. Drain off any excess grease.


Now add spaghetti sauce and macaroni to the skillet and cover.     If you want a more loose, soupy consistency, add about 1/2 a cup of water to the mixture. Reduce heat and let simmer 5-7 minutes or until hot.


Sprinkle with cheese and cover. Cook for another 3-5 minutes or until cheese has melted.


Serve your goulash with a nice, crusty bread and a salad...but only if you're feeling obligated to see something green on your plate that isn't covered with cheese. I don't usually feel that obligation.

Join me for the next Tabletop installment in two weeks: Apples to Apples-tuffed Pork Chops! 


I'll also be getting ready for the season premiere of Game of Thrones! We'll be cooking up a meal fit for Kings and making mead! That's right, guys...MEAD! Don't forget to follow me on twitter and join the community on Facebook for all the latest 8-Bit Cook news!

And be sure to pop in tomorrow for a lesson in homemade Italian bread! YUM!

POINTS

+10 Sautéing
+5 Chopping
+10 Dicing
+5 Boiling


Thursday, February 21, 2013

Quest 1.7: Pan-Seared Chicken!

Welcome back, Apprentices! Today, we're making pan-seared chicken. This is the easiest, most versatile and delicious chicken recipe you will ever make. It's also an excellent way to prepare chicken that fools people into thinking you're a really, really good cook. So, get out your skillet and prepare those humble-brag speeches because this chicken is sure to please!


INGREDIENTS:

Boneless, skinless chicken breasts
salt
pepper
onion powder
2 Tbs vegetable oil

GEAR:

Cast iron skillet
2 Pairs of tongs (or a sturdy fork & 1 pair of tongs)
Splatter screen


Choose your chicken! If you're going to be a carnivore, be a responsible one! Look for cage-free, organic chicken whenever possible. I understand that not everyone has access to a Whole Foods or a farmer's market in their area but it's always a good idea to be conscious of what you're eating. It's good for your health and it's good for your Karma! It also appeases those nightmare ghost chickens that hunt you in the night for buying chickens raised in inhumane conditions.


Pre-Heat your skillet! Add the two tablespoons of oil to your cast-iron skillet and turn the stove on medium-high. You might be tempted to use a non-stick pan for this quest. I would not recommend it. Remember a few posts ago when we talked about pots and pans? We discussed non-stick pans and the dangers of heating those pans to temperatures to and exceeding 500ºF. This quest will quickly and for an extended period of time raise your skillet to that temperature. If you're not using cast-iron, use stainless steel. The clean-up will be a little more high maintenance but stainless steel can reach 500ºF without posing any health risks to you or your pets.


Season your chicken! Sprinkle one side of your uncooked chicken with salt, pepper and onion powder. Feel free to use a dash of garlic powder as well. I didn't give any precise measurements for the seasoning because, frankly, it's not really necessary. The interesting thing about chicken is that it has no real flavor until you season it; which is why seasoning is SO important when cooking chicken! Don't be afraid of it! Embrace it!


*TIP Know the difference between onion powder and onion salt (and garlic powder & garlic salt). If you see "salt" in the name, that means it's onion powder with salt added to it. Make sure you do not substitute onion salt for onion powder and then add extra salt. The result would be bad, bad, bad.

Place your seasoned chicken in the pre-heated skillet - seasoned side DOWN. Why, you ask? Well, because you need to season the other side, of course! Chicken tastes better if you season both sides. Fact! So season the other side just like you seasoned the bottom.  


Cover with a splatter screen and let it do its thing! Splatter screens are super-handy and not just because you'll save your stove from a big, fat mess but you'll also save yourself from a sh*t-ton of awful little burns from the hot oil. Also, fight the urge to push the chicken around in the skillet because the goal with this recipe is to create a nice, brown crust. Remember when we caramelized onion? Essentially, we're doing the same thing to this chicken. By searing the chicken at a relatively high temperature for an extended period of time, we're bringing out the natural sweetness of the meat and trapping all those delicious juices at the same time!


Check your chicken! When the tips begin to turn white, use a fork or tongs and gently check the bottom of the meat. You're looking for a nice, dark brown, crusty surface. The goal is to only flip the meat once. In my experience, the chicken is juicier and more tender if you just let it rest in the pan and cook. Try not to repeatedly flip the meat from one side to another.


Your chicken is ready to flip when you have that gorgeous, golden brown crust. If you see any pink on the meat, let your chicken cook a little longer. Remember, chicken is NOT like beef! Beef is perfectly safe to eat when it's prepared rare or pink in the middle; chicken is not! Poultry, when not cooked thoroughly can make you violently ill. Salmonella poses a very real threat to your health and the health of your loved ones (...not to mention possible death and dismemberment if you get the wrong member of your party or clan sick).  When preparing chicken, it's not only important to cook the meat completely, but you must also be sure to thoroughly clean your prep surfaces. Never use the same knives or cutting boards to prep other foods after prepping raw chicken. A good idea is to fill your sink with hot, soapy water before prepping your chicken and then move the knife and cutting board directly to the sink as soon as you finish with the chicken or immediately transfer your tools to the dishwasher.


Let your chicken cook until both sides have that gorgeous, golden brown crust. With a CLEAN pair of tongs or fork (never use any tool with cooked chicken that you used on raw chicken - SALMONELLA, people!!), immediately remove from the pan to avoid over cooking and let the meat rest for about five minutes before cutting to preserve the juiciness. Serve with steamed vegetables and a baked potato for a delicious and *COUGHhealthyCOUGH* meal!


Other easy meal ideas for this chicken recipe:

Chicken Alfredo: Simply cut into strips or cubes and serve over pasta with your favorite alfredo sauce.

Chicken Fajitas: Drizzle with lime, cut into strips and serve with sautéed bell peppers, onion and flour tortillas for quick and easy fajitas.

Chicken Salad Sandwich: Cut chilled chicken into small cubes and toss with diced apple, celery, mayo, onion, salt & pepper. Serve on your favorite bread.

Bacon Chicken Avocado Sandwich: Remove from skillet and serve on a toasted bun with bacon, sliced avocado, mozzarella cheese, lettuce and tomato.

Cajun Chicken Pasta with Andouille Sausage: When cooking your chicken, sprinkle liberally with cayenne pepper. Remove from heat, cut into strips & toss with sautéed andouille sausage, angel hair pasta and your favorite marinara sauce.

Chicken Pasta Salad: Cut chilled chicken into cubes and toss with cooked bow-tie pasta, cold italian salami, black olives, chick peas, roasted red peppers, cherry tomatoes and drizzle with vinaigrette dressing. Serve cold.

Spinach Chicken Salad (pictured below): Cut chilled chicken into cubes. Toss with fresh spinach or spring mix salad, sliced strawberries, dried cranberries, diced tomatoes, crushed walnuts, crumbled feta cheese (or blue cheese) & drizzle with balsamic vinaigrette.  Crumbled bacon is also wonderful with this salad.


Have fun and get creative with this recipe! The great thing about any recipe is that you have the ability to change it to make it your own. Never be afraid to deviate from the recipe. What's the worst that could happen? Something might burn or taste awful... but every dish is a learning experience and every failure is just an opportunity to make something delicious!

Points:

+10 Sautéing

Remember to like us on Facebook and follow on Twitter for all the latest 8-Bit Cook news!


Thursday, February 7, 2013

The Walking Dead: Season 3 Special!

Welcome back! It's almost time! Season 3 of The Walking Dead returns this Sunday, February 10th at 9/8PM central on AMC. Who's excited? *This girl!* Walking Dead fans, this post is for you! I put together a meal to give you some ideas for that mid-season premiere party or just a small dinner for you and the fam.

What's on the menu? Braaaaains! Naturally. Well...sort of. Today, we're making Tasty Brain Sliders, fried Pota-TO(E) cakes with honey-mustard dipping sauce, Creeping Zombie cocktails and Bloody Delicious Brownies! And because presentation is part of the fun, we're serving it all up on a prison cafeteria tray!


I bought the stainless steel cafeteria tray through Amazon. You could also search eBay for a wide selection of used cafeteria trays.

Tasty Brain Sliders

Ingredients:

Ground Turkey (1-2 lbs)
Cooked Bacon
1 Avocado
1-2 Roasted Red Bell Peppers
Romaine Lettuce
Slider Buns

Optional condiments for personal burger building (mayo, mustard, tomatoes, onion etc.).

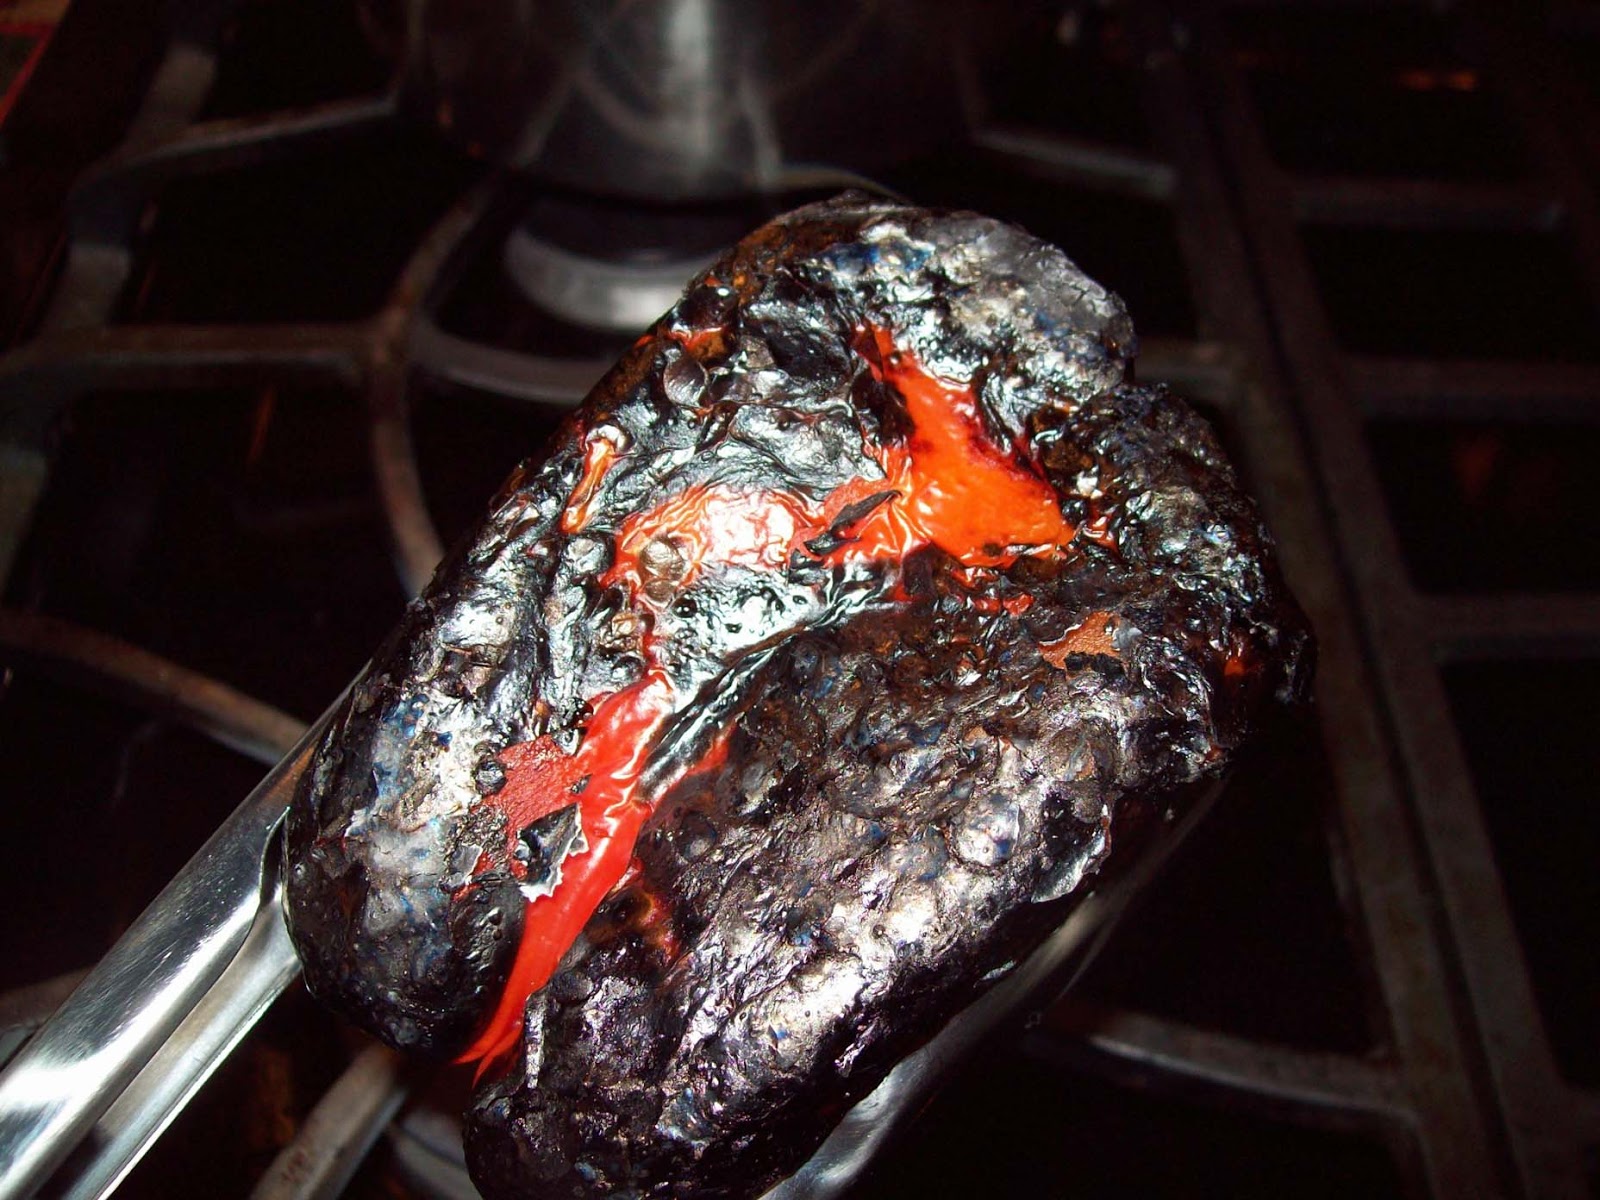
Roast your peppers! Roasting peppers is actually very easy, especially on a gas stove. Just rinse and completely dry your pepper, turn your gas burner on high and set the pepper directly on the iron grate. Let it rest until the skin turns black. Using tongs, rotate the pepper over the flame until the skin has turned black on all sides of the pepper. Once the pepper has turned completely black, remove it from the flame, place it in a paper bag and roll the bag closed. MAKE SURE there are no parts of the pepper that have ignited from the burner, you don't want to light the bag on fire. The purpose of the bag is to steam the pepper, soften the meat of the pepper and loosen the skin. Let it sit for about 10-15 minutes, remove and use your fingers to gently pinch off the crispy, blackened skin. Slice the pepper, remove the seeds and ribs (unless you want a crazy hot slider). Set aside in an air-tight container and refrigerate until you're ready to build the sliders. If you want to save time, you can always buy fire-roasted red peppers by the jar at any grocery store but doing it yourself is easy and saves a lot of money.  It also makes your house smell awesome.


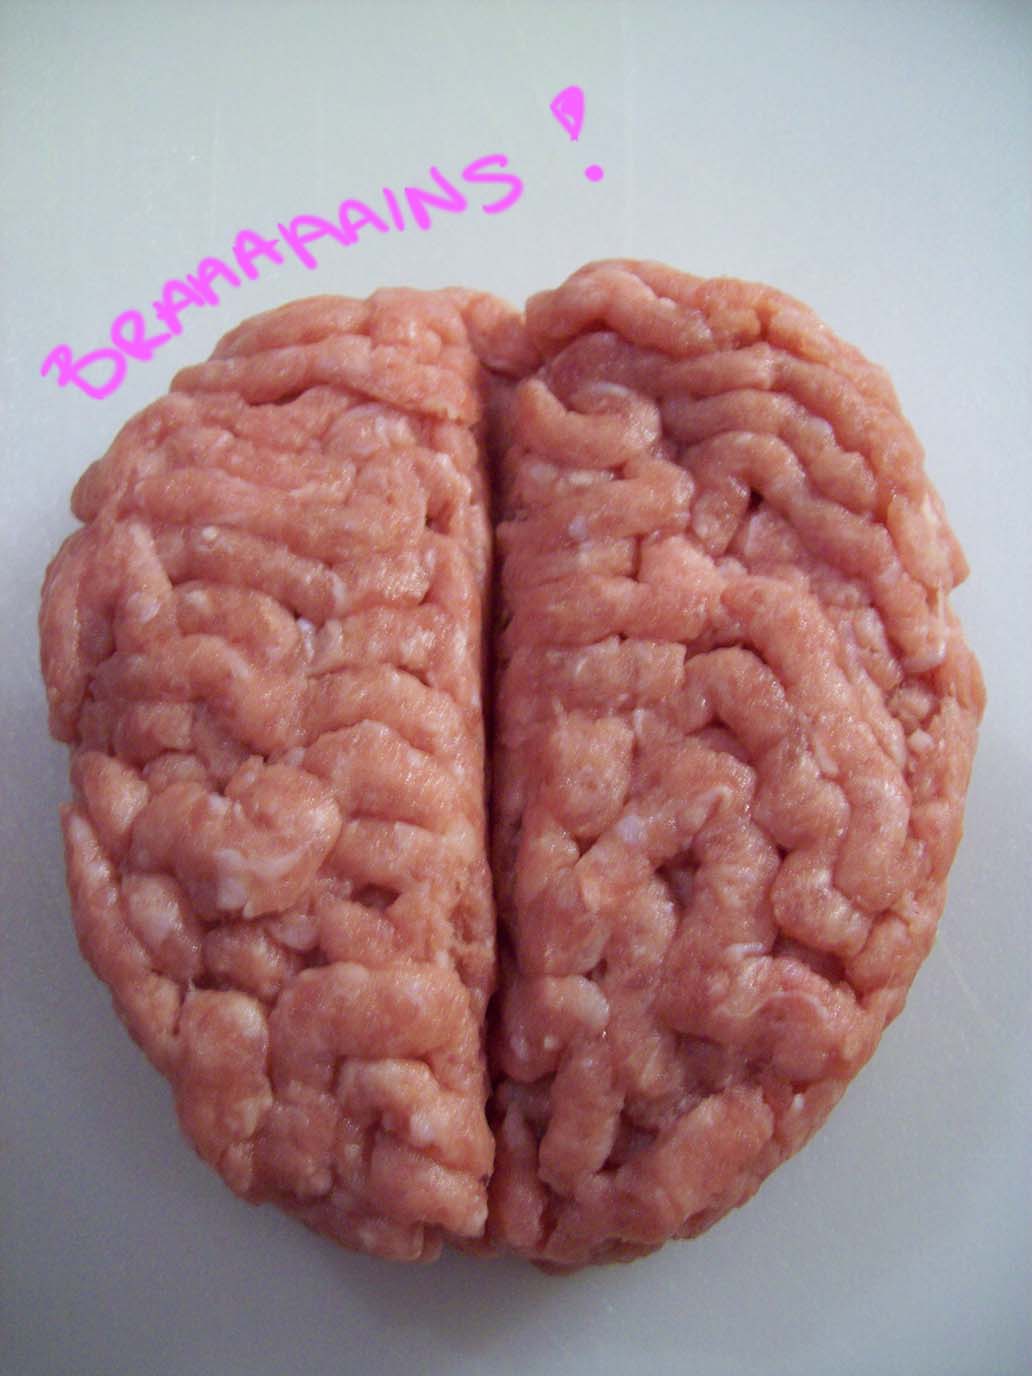
The beauty and the horror of ground turkey is that it looks a little frightening in the package. The way turkey is ground makes for perfect brain matter! Look for a package of ground turkey with a nice, thick gauge ground. You're a Walking Dead fan, you know what brains are supposed to look like! One pound of ground turkey should make 6-8 sliders depending on the thickness of the patty.

Make your brains! You want to handle the turkey as little as possible to maintain that brain matter look because as the meat cooks and the fats dissolve, some of that detail will be lost. Gently shape the turkey into a round patty with one slightly tapered end and use a knife to divide your "brain" into two hemispheres. Be careful not to cut through the meat completely. Just make a little valley. After cooking, you might have to use a knife to re-carve the seam a bit.


Turn your broiler to HIGH

Place your brain patties in a cast iron skillet. Move your oven rack to the top slot (patties should be roughly four inches from the flame) and broil on high for 6 minutes. Turn the patties over and let cook for another 4 minutes. Cook for a total of 10 minutes for thinner patties. Thicker patties may take longer.

Build your sliders! Smash the avocado with a fork and use a butter knife to fill the seam dividing the hemispheres of the "brain" and lightly smear the lobes for effect.

My build, from the bottom up:

Lettuce
Red Peppers
Bacon
Turkey
Avocado


Fried Pota-TO(E) Cakes

Ingredients:

2 Cups Mashed Potatoes
1 Cup Flour
1 Egg
1 Green Onion, finely chopped
1 Cup Vegetable Oil for frying

In a bowl, mix together mashed potatoes, flour, egg and onion. Using your hands, form into little log shapes and set aside. The mix will be very sticky. So sprinkle the mix with a little extra flour to keep it from sticking to your hands.

Pre-heat your oil to 350º and fry until golden brown...about 5 minutes. Set your potato cakes on a paper towel-lined plate to drain the extra grease and sprinkle with salt.

Honey-Mustard Dipping Sauce

Ingredients:

1 Cup Mayonnaise
1/4 Cup Yellow Mustard
2 Tbs Honey

Mix all the ingredients together well and adjust to taste. If it's too mustard-y add a little more mayo and if it's too sweet add a little more mustard. Not sweet enough? Add more honey!


Bloody Delicious Brownies
(Chocolate Cheesecake Brownies)

Cheesecake Swirl Topping:

8 oz. Cream Cheese
3/4 Cup Sugar
1 Egg
1/2 Tsp Vanilla Extract

Bloody Chocolate Drizzle:

1/2 Cup Chocolate Syrup
1 oz. Red Food Color

Brownie Batter:

1/2 Cup Semisweet Dark Chocolate Chips
1 1/2 Cups Butter
2 Cups Sugar
4 Eggs
1 Tsp Vanilla Extract
1 oz. red food color
1 2/3 Cups Flour
2 Tsp Baking Powder
3 Tablespoons Dark Cocoa Powder

Cream together cream cheese and sugar until fluffy. Add vanilla and egg and beat together well. Set aside.

In a saucepan, melt butter and chocolate until smooth. Gradually, whisk in the sugar. Add eggs, red food color and vanilla. Combine completely.

In a separate bowl, sift together flour, baking powder and cocoa powder. Add batter and mix together until it's nice and smooth. No lumps!

PRE-HEAT Oven to 350º

Pour brownie batter into a greased 9x13" pan and carefully drizzle cheesecake batter on top in a swirly, back-and-forth pattern. Try not to pour too much into the same spot. Using the tip of a butter knife or a spatula, swirl together the cheesecake batter with the brownie batter.

Bake on the middle rack for 45 minutes or until the center is no longer jiggly. Cool completely before cutting. Mix chocolate syrup with red food color and drizzle brownie before serving.


The Creeping Zombie

I set out to make a drink called the Festering Zombie but I didn't like the way it looked and it was too sweet so I changed up some of the ingredients and the assembly and voila! The Creeping Zombie was born! I named it that because it will seriously creep up on you and bite you in the ass.

3 3/4 Cups Orange Pineapple Juice
2 Cups Club Soda
3/4 Cup Sweet and Sour Mix
1 Cup Coconut Rum
1 Cup Vodka
Midori Melon
Grenadine

In a half-gallon pitcher, mix together juice
, club soda, sweet & sour mix, rum and vodka. Refrigerate until ready to serve. Pour over ice until glass is about 3/4 full and top with Midori and Grenadine for that nice, layered look.


*Disclaimer - Drink responsibly, kids. This is a sweet, tasty drink and it is very easy to get very drunk. So BE CAREFUL!


So, that's the meal!  There's nothing like a season premiere (or mid-season premiere) of your favorite show to get the creative juices flowing in the kitchen!

Questions or comments? Leave them below! You can also join the community on Facebook  and follow on Twitter!

Don't forget to tune in after The Walking Dead for a full hour of Talking Dead with Chris Hardwick! I don't know about you, but I have a feeling I'm going to need that extra half our of post-show therapy.

Apprentices, don't forget to check in next week for your next quest, Pan-Seared Chicken!


Friday, January 25, 2013

Quest 1.6: Bread, Glorious Bread!

Welcome back, Apprentices! Today, we're baking bread! I have a special relationship with bread; it's a little disturbing and sometimes sado-masochistic. My safe word is "oh-shit-I-can't-fit-into-my-pants-anymore." And although I feel the sting of the un-zippable zipper, I keep going back for more and the cycle repeats itself.


"Step one, give a f*ck about baking." - Hannah Hart My Drunk Kitchen. 

Bread is delicious, versatile and travels well on those long treks across Middle-Earth or Azeroth.  Many people get intimidated at the idea of baking their own bread. But baking homemade bread is not very difficult; it's just time consuming. So, Apprentices, I'm starting you out with the easiest bread recipe I could manage; sesame seed hamburger buns! The beauty of bread is that all breads are made up of, more or less, the same ingredients: flour, yeast (or in some cases baking powder), sugar, water, salt and sometimes, eggs. You can simply interchange these ingredients (i.e. whole wheat or rice flour for unbleached) to change up the bread. A little fair warning before we get started; once you start making your own bread, you will find it extremely difficult to go back to store-bought. Homemade bread is denser, more filling and  far more delicious than anything you could get in a plastic bag from the grocery store! So, roll up your sleeves and get ready to knead because we're baking bread!

Sesame Seed Buns
Yield: 8 Regular-sized hamburger buns

Ingredients:

3 1/2 Cups All-purpose Flour
1/4 Cup Sugar
2 Packets Active Dry Yeast
2 Tbs melted butter
1 cup warm water (100°F-140°F)
2 Large Eggs
1 1/4 Tsp Salt
Sesame Seeds (to garnish)

TOOLS:

2 large mixing bowls
2 baking sheets
Sturdy spatula
Small whisk or spoon
Parchment Paper or Non-Stick Spray
Pastry Brush


*TIP - Pre-measure your ingredients and separate them into bowls (just like you see on all those cooking shows). You'll be surprised how easy it is to lose track of how many scoops of flour you've added to a mix and it's easier to fix those problems when your ingredients are still separate than when you have everything in one bowl. 

Activate your yeast!  Yeast is a living organism, a fungus, and when active, it releases carbon dioxide that causes bread to rise. Activating your yeast will cause it to foam and grow right before your eyes and you'll know, without a doubt, that your bread will rise. 

Pour the warm water into your large mixing bowl and dissolve in 1 tsp of sugar (taken from the 1/4 cup of sugar you have already measured out for the dough). Just give it a gentle stir with a whisk or a spoon until there are no more sugar granules in the bottom of the bowl. Now, sprinkle the yeast on the surface of the water as evenly as possible and step away to let the yeast do its thing. The yeast should take a 5-10 minutes to fully activate. If your yeast hasn't activated within 10 minutes, it's dead; throw it out and try again. Be sure not to get your water too hot because you could kill your yeast. As a point of reference, the water should not be as hot as a cup of coffee. Usually 30 seconds in the microwave will do the trick. You should be able to hold your finger in the water without any discomfort. But when in doubt, bust out your handy-dandy thermometer!


Add flour, sugar, 1 egg, melted butter & salt! This is part of what makes these the easiest buns ever...you just dump it all in...no folding or careful measuring. Just go for it!


Using a sturdy spatula, mix the ingredients together thoroughly. Do not use a whisk! If you use a whisk, it will turn into an instrument of terror as you will only end up with the dough stuck in the middle of the whisk and spend the next ten minutes digging it all out. Mix the dough with the spatula until it looks like this:


*TIP - A set of good spatulas are vital to any arsenal. Look for stainless steel handles and silicone, heat resistant heads. They will make your life so much easier!

Get your hands dirty! At this point, you've gotten about as far as you're going to get with that spatula. The best tool in your kitchen is a nice, clean pair of hands! Give your hands a scrub (if you haven't already and if not, GROSS!!) and work that dough with your hands. You can knead the dough right there in the bowl if it's big enough. If not, lay down some parchment paper, sprinkle it with flour and transfer the dough to the paper. Work the dough until it is smooth and elastic and transfer to the other clean, large bowl.


Cover the dough with plastic wrap and let rise! Set the bowl in a warm, dry place and walk away. Go play a video game or watch a movie and check on your dough about an hour later. There is no set time for dough to rise. Many recipes will say it takes "one hour" but there are a lot of factors that will effect how fast your dough rises. So don't stress about the time. Your dough is ready when it has doubled in size.


*TIP Make sure you choose an area for your dough to rise that your cat hasn't chosen to plant her ass and stalk hummingbirds like the fierce predator she is.


Deflate your dough! Using your hands, gently deflate your risen dough. Divide your dough into 8 equal pieces and roll into balls. Line your baking sheets with parchment paper or spray them with non-stick spray. Space your balls of dough about 2 inches apart. Use your hands and gently flatten the balls to make more of a bun shape. For my dough, I divided it differently, making 3 regular buns, 3 slider buns and 2 sub sandwich buns (I also made an extra batch because I'm prepping for my upcoming Walking Dead mid-season premiere special! So tune in!). As I said earlier, this dough is so versatile and you'll be able to get a ton of uses out of this recipe!


Cover with plastic wrap and let rise (again) until they are visibly puffy. The second rise usually doesn't take as long so check on it in about 30 minutes.


Pre-Heat Oven to 375º

Using a whisk or fork, beat the other egg well. Make sure the yolk and white are completely integrated. With a pastry brush, very gently brush the surface of your buns with the egg-wash and sprinkle with sesame seeds. The egg-wash is what gives the buns that beautiful, golden-brown sheen and makes the sesame seeds adhere to the top. If you prefer seedless buns, brush them with melted butter instead.


Place in the oven on the middle rack and bake for 15-18 minutes.

Your house will start to smell like Heaven in a few minutes and you'll wonder why the heck you never baked your own bread before. When your buns are golden brown, remove from the oven and transfer to a cooling rack or slice and serve immediately.


The buns will store very easily. You can make a couple of batches, seal them in an air-tight freezer bag and store in the freezer. Be sure to date the bag for freshness. When serving them out of the freezer, slowly bring them down to room temperature, wrap in foil and warm in the oven or lightly butter and put them on the grill.

You did it!! You made bread! How awesome are YOU?!? You also just earned yourself a big, fat load of points!

POINTS:

+20 Baking

Make sure to tune in next week when we cook more stuff! Join the community! Like us on Facebook and follow on Twitter for all the latest 8-Bit Cooking news!