Wednesday, April 24, 2013

Quest 2.0: Pizza Party!

Welcome back, Apprentices! Holy crap! You made it to level 2! You did it, guys! All that baking, boiling, sautéing, slicing, dicing and chopping got you here! And what better way to celebrate than with a pizza party? That's right, kids, you're going to learn to make pizza from scratch today! But be warned; like bread, once you learn to make your own pizza, you realize how completely sub-standard frozen or even delivery pizza really is. You will become a pizza snob, casually thumbing your nose at greasy, tasteless pizza with cardboard crusts and freezer-burned vegetables. In this post, I'm going to demonstrate the versatility of pizza dough. We'll be making my favorite roasted garlic white pizza, cheesy pizza sticks and garlic knots!


<--- Admit it! You want this in your face!


You want this in your face, too! ---->


TIP: Make the sauce the day before you plan to make the pizza. Spreading out the work will make you less tired and the enjoyment of shoving your face full of pizza will be heightened.


ROASTED GARLIC WHITE SAUCE
*This recipe makes two batches of sauce. Cut recipe in half for one pizza.

10-15 Cloves Roasted Garlic
4 Tablespoons Butter
2 Cups Milk (whole or 2%)
1 tsp Salt
1/2 tsp Cayenne Pepper
4 Tablespoons Flour
1 Tablespoon Olive Oil


Roast your garlic! Remember that post all about roasting garlic? DO THAT! Too lazy to refer back to that old quest? Fine! I'll go over it again, but only because you asked nicely. But to keep this post from getting too long, you're getting the condensed version...and you're going to LIKE IT!

PRE-HEAT OVEN to 375º

1. Peel outer skin and chop off the top 1/4 of the head of your garlic.
2. Drizzle with olive oil and sprinkle with salt & pepper.
3. Wrap loosely in tin foil, forming a tent.
4. Bake on oven-safe baking sheet for 45 minutes to an hour.
*Garlic is done when the cloves are golden and soft.
5. Peel and set aside.


                                     Start your sauce! 


In a sauce pan, gradually warm the 2 cups of milk over LOW heat. Use a whisk and stir frequently to keep the milk from scorching.


In a separate sauce pan, melt the butter. Add two tablespoons of flour to the melted butter. Whisk the mixture well and add one tablespoon of flour. Whisk the mixture again and add the last tablespoon of flour.


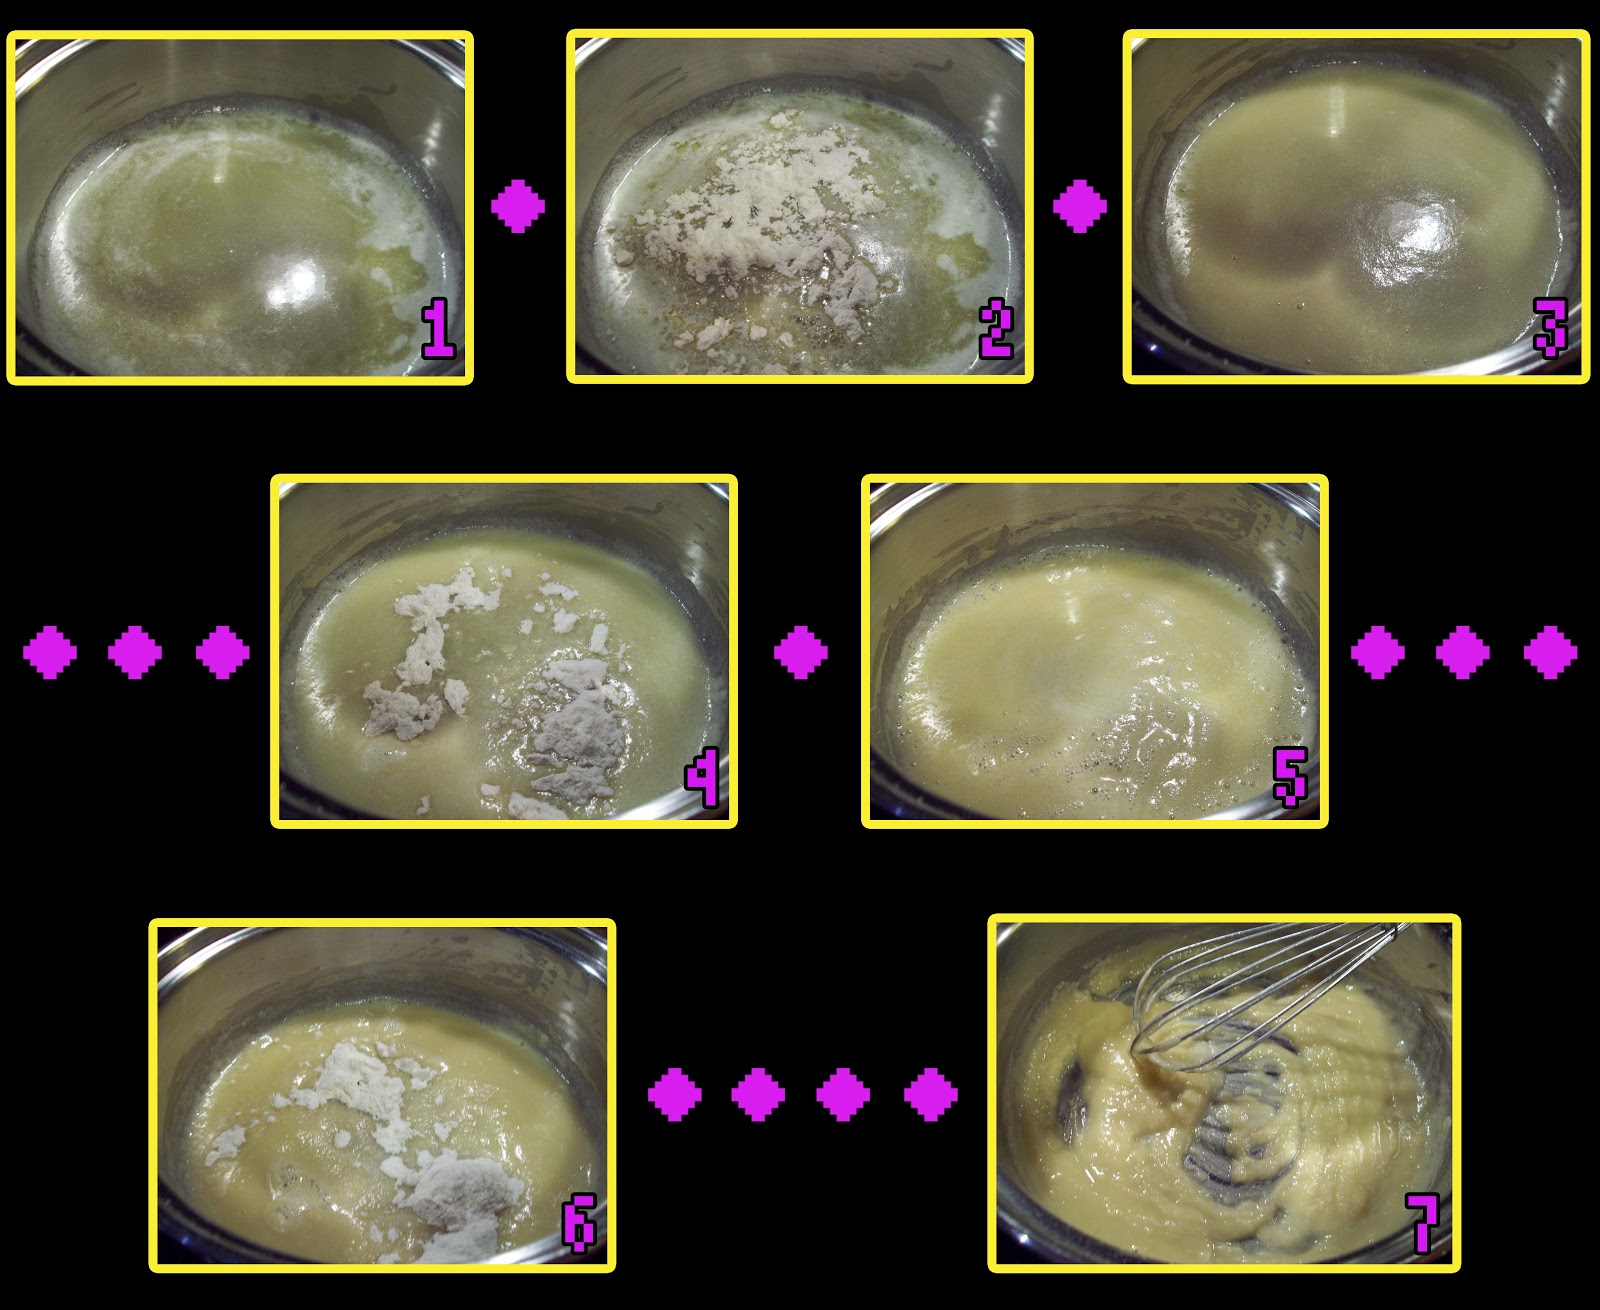
Gradually add warm milk to the flour/butter mixture. Add the milk at a rate of about a 1/4 cup at a time. Whisk the mixture well as you add the milk. At this point, the mixture will start to seize up and lump together. Don't panic! That's supposed to happen. As long as you continuously whisk the mixture,  the sauce will smooth out as you add the rest of the milk. But again, don't add the milk all at once. Keep it gradual and keep whisking.

*Pictured above - scary, seized up milk/flour/butter mixture and gorgeous, smooth sauce after much patience and whisking. I couldn't take pictures of all the in-between stages because it's actually a very fast process. 


Add salt, cayenne and one tablespoon of olive oil. Whisk together well (I know, you're sick of the word "whisk"...it's almost over...) and let the sauce simmer over low heat for about 10 minutes or until thickened, stirring occasionally.


Pour the sauce into a food processor or blender (or use a submersion blender) and add roasted garlic cloves. Blend it together well and set aside. If you prepared the sauce a day or two before you need it, cover it well (I recommend an air-tight plastic container) and refrigerate.


BASIC PIZZA DOUGH
*This recipe makes two batches of pizza dough; enough for two 15" pizzas or one 15" pizza, plus pizza sticks & garlic knots. Cut recipe in half for one pizza.

2 Cups Warm Water
2 Packets Active Dry Yeast
4 3/4 - 5 Cups Bread Flour
2 tsp Salt
1 1/2 Tablespoons Sugar
1 Tablespoon Olive Oil
1 Cup Grated Parmesan Cheese
Yellow Cornmeal

Warm water to about 100ºF. Remember not to get the water too hot or you will kill the yeast and your dough won't rise. Pour warm water in a mixing bowl (if using a stand mixer, use the mixer's bowl; if not, use a large mixing bowl) and stir in sugar and olive oil. Sprinkle the yeast evenly on the surface of the water and let the yeast foam (activate). It takes about 5-10 minutes.


In a separate bowl, measure out the flour and mix in the salt. Using an electric mixer with a dough hook, gradually add the flour/salt to the water/yeast mixture to form a smooth, elastic dough. *If you don't have a mixer, use a heavy duty spatula or wooden spoon. As the dough begins to thicken use your CLEAN hands to work the dough until smooth.*


Remove from the mixing stand. Add the parmesan cheese and work the dough with your hands until the cheese is evenly distributed throughout the dough. Drizzle a large bowl with olive oil and transfer the ball of dough to that bowl. Turn the dough over in the bowl, coating it with a thin layer of olive oil.


Cover with plastic and let rise until doubled in size. About 1 hour. Using your hands, deflate the dough and divide the dough in half.


For the sticks & garlic knots, sprinkle a large cookie sheet evenly with cornmeal. The cornmeal prevents your pizza crust from sticking to the cookie sheet and helps in creating a firmer, crispier crust.   


For pizza sticks and garlic knots, divide one ball of dough in half again (you should now have three balls of dough; one larger and two smaller balls of equal size). Using your hands, press one of the smaller balls of dough into a rectangle. Try to make the thickness of the dough as even as possible. Press it down until it is about 1/4" thick. Divide the other smaller ball into 6-8 even SMALLER balls. Roll the smaller balls into ropes (like with Play-Doh when you were a kid) and then simply form the rope into a knot.

*TIP Let the pizza dough rest for a few minutes after you push it into the rectangle shape. You may find the elastic nature of the dough has pulled the shape inwards, making it smaller. By letting the dough rest and then RE-working it into the size you want, you will minimize shrinkage before and during the baking process. 


Melt 2 tablespoons of butter and using a pastry brush, coat the garlic knots with butter and sprinkle with garlic powder and a little salt. Spread the rectangle of dough with the garlic white pizza sauce, making sure you take the sauce to the edge of the crust and sprinkle with grated mozzarella cheese. It is important that you push the sauce towards the outer edge of the dough. When the pizza bakes, the heat will draw everything towards the center of the pie. You want to minimize that inwards pull and make sure the cheese and sauce are evenly distributed.


PRE-HEAT OVEN to 500ºF 
*Temperature is for sticks, knots and pizza

Bake on the middle rack for 12-15 minutes. Brush the garlic knots once more with melted butter and slice the rectangle into sticks.


The sticks and knots make a fantastic appetizer or a fun treat for the kids. Serve them up with some red pizza sauce to dip (I like Ragu when I'm feeling lazy and I add a little cayenne for some extra kick...you'll learn homemade red sauce in a later lesson).

For the pizza, pre-heat a pizza stone (or you can use a room temperature cookie sheet in a pinch). Sprinkle the hot pizza stone (or cookie sheet) with cornmeal and press the dough into a 15" disk.

*TIP I highly recommend getting your hands on a pastry mat. With a pastry mat, you roll the dough out on this non-slip surface and then transfer easily to the pizza stone. A pastry mat will make your life so much easier!

I spent a little time working in a pizza parlor as a kid and I learned some super-handy tips and tricks to making good pizza. After you spread out your sauce, sprinkle with a small amount of cheese. Having that little bit of cheese will give your toppings something to bond to on the bottom, keeping your toppings from sliding off your pizza and onto your plate when eating. Now, add your favorite toppings! I chose caramelized onions, roma tomatoes, roasted peppers (red & green bell peppers & jalapeños) and baby portabello mushrooms.

Bake 12-15 minutes or until the crust is golden and cheese is melted! Let the pizza sit for about five minutes before you cut into it.


You did it!! Enjoy shoving your face full of delicious pizza! In the future, we'll be doing more themed meals for True Blood and Doctor Who's 50th Anniversary Special. And we'll be having more tabletop themes as we play Apples to Apples and Four Taverns!


Don't forget to like us on Facebook and follow on Twitter for all the latest 8-Bit Cook news!

POINTS

+10 Baking


Wednesday, April 17, 2013

Quest 1.9 Tex-Mex! King Ranch Chicken Casserole

Welcome back, Apprentices! Today, we're going back to my roots with a delicious and easy Tex-Mex dish called King Ranch Chicken Casserole. What is King Ranch Chicken Casserole, you ask? Well, it's basically a creamy chicken enchilada casserole with just the right amount of kick and a whole lotta cheese! Serve it up with some refried beans, spanish rice and guacamole (don't forget the margaritas!) and it is sure to please!


King Ranch Chicken Casserole

3 Chicken Breasts & 3 Chicken Thighs - Poached & shredded
    or 1 Whole Rotisserie Chicken Shredded
1 Can Cream of Chicken Soup
1 Can Cream of Mushroom Soup
1 Can Medium or Hot Diced Tomatoes with Peppers, Drained (Rotel or Hatch)
1 Medium Onion
Corn Tortillas 
1/4 tsp Cayenne Pepper
1 tsp salt
1/4 tsp ground black pepper
2 Cups Mixed Shredded Cheddar & Monterey Jack Cheeses

Prep your chicken! Remember what we did last week with the chicken fried rice? If you're using fresh or frozen chicken, do that again! Boil your chicken in a large pot for about 45 minutes until the meat is white and juices run clear. If you bought a pre-cooked rotisserie chicken at the grocery store, that's fine. I would recommend getting one seasoned only with salt & pepper or with garlic. Let the chicken cool and shred with a fork. Put it in a large bowl and set aside.


Pre-Heat Oven to 350º


Dice your onion! Using a clean, sharp knife and a cutting board, dice your onion. Don't worry about getting the pieces too pretty. It's all going to be one delicious, mixed up masterpiece of yumminess!

Mix together chicken, cream of chicken soup, cream of mushroom soup, canned tomatoes (drained), onion, Cayenne, salt & pepper. Make sure it is well combined before continuing to the next step!


Grease a 9" x 13" inch lasagna pan or a large casserole dish. Line the bottom with corn tortillas. I'm weirdly compelled to cover as much of the area of the pan as possible. You don't have to be as weird as I am. I don't recommend it at all. It makes life a little difficult. Just layer as evenly as possible.


Layer 1/2 the chicken mixture on top of the tortillas and distribute 1/2 the cheese evenly on top of the chicken mixture. Repeat, creating a second layer. You should have just enough mix and cheese for 2 nice layers in a lasagna pan.


Cover with foil and bake for 30 minutes... remove foil and return to the oven for another 20-25 minutes or until cheese is melty and bubbly.


When done, be sure to let the casserole rest for about 10 minutes. I know, it's torture. But if you cut into it right away, all those gorgeous layers are going to spread. So, take that time to mix up some margaritas, do a shot of tequila or just stand over the pan and drool.


See! I told you it was easy! We'll revisit Tex-Mex casseroles again in the future. I have an insanely delicious Taco Casserole that I learned to make when I was a freshman in high school and I still make it to this day! We'll also explore burrito bowls, carnitas and maybe we'll even make some tortillas from scratch just for shits and giggles!


POINTS:

+5 Dicing
+5 Baking
+5 Boiling (If you took the time to poach your chicken)

Don't forget to like us on Facebook and follow on Twitter for all the latest 8-Bit Cook news!


Tuesday, April 9, 2013

Intertainment From The Enter-Webs

Welcome back, Apprentices! Today, we're taking a break from the kitchen so I can share with you some of my favorite web series! But don't worry because tomorrow we'll be back with one of my favorite Tex-Mex recipes, King Ranch Chicken Casserole! YUM!

The internet is truly the new frontier for entertainment. With technology and quality equipment so readily available, anyone with a good idea, a lot of talent  and a boatload of passion can make a web series. Don't get me wrong, anyone can make a web series but not just anyone can make a good web series. There is some truly mind-blowing talent on the internet creating everything from cooking, gaming and DIY shows to dramatic, comedic and Sci-Fi series good enough to rival anything in theaters or on television. So settle in and get ready to lose (more) hours of your life to the internet because these are my favorite shows!


The Guild

Where better to start than at the beginning? The Guild was the first web series to really capture my attention. Written and produced by Felicia Day (Buffy the Vampire Slayer, Dollhouse, Dr. Horrible's Sing-Along Blog), The Guild centers around main character Codex (Felicia Day) and her MMORPG guild-mates. In-game relationships cross over into reality when Zaboo (Sandeep Parikh), a guild-mate with a crush, tracks Codex down in real life, proclaims his devotion and moves into her apartment. Codex organizes a meeting with the rest of her guildies to try to convince Zaboo to go home to his mom. In spite of his creepy, cyber-stalkery ways, Codex begins to sympathize with Zaboo and the guild relationships evolve into real friendships. The Guild has 5 seasons under its belt and is available to view on YouTube and Netflix.


A Simple Walk Into Mordor

 If you're a Lord of the Rings fan, you know the filming locations for the three epic movies are all located on the two islands that make up the country of New Zealand. Two fans, Chris and Kerry, decided to make the trek on foot, Fellowship-style, from Matamata (the location for the Shire) to Mt. Ngauruhoe (the double for Mt. Doom). A Simple Walk Into Mordor is the five-part documentary of their adventure. Armed with backpacks, cameras and one seriously hot Kiwi guide, the boys set out to cast the cursed Ring into the flames of Mt. Doom (or dig a shallow hole and bury it...whatever works, right?). The documentary is funny, sweet and at times, a little bit gross (for the record, blisters do not pop like bubblewrap and are not nearly as fun!).

So, check out the Rooster Teeth channel on YouTube and subscribe (it's FREE!) for all 5 episodes and more great, original content!


TableTop

Who wants to sit around and watch (almost) total strangers play tabletop games? When the Geek & Sundry network announced this show as part of their debut lineup, I asked myself that same question. And then I watched the first episode and was instantly hooked. Hosted by Wil Wheaton (Stand By Me, Star Trek: TNG), Tabletop is a surprisingly fun and engaging web series with new episodes every other Thursday featuring Wil playing a new tabletop game with his friends. His guests usually consist of a variety of actors, hosts, comedians and game creators from television, movies and the internet. The majority of the guests are hilarious and fun to watch. And the competition gets real sometimes but never in a negative or awkward way. TableTop is a great way to learn about games you might not know existed and perhaps start your own tabletop night with your friends!

Be sure to subscribe to Geek & Sundry to support all their fantastic, free content!


The Lizzie Bennet Diaries

"It is a truth, universally acknowledged, that a single man in possession of a good fortune must be in want of a wife." - Pride & Prejudice

The Lizzie Bennet Diaries is a unique modern adaptation of the classic Jane Austen novel Pride & Prejudice. Using a single camera, video diary filming style, we follow the adventures, love and heartache of our heroine Lizzie (Elizabeth) Bennet, her sisters and her friend, Charlotte. Of course, the relationship most viewers focus on is the epic romance between Elizabeth Bennet and Darcy. Although Darcy in the web series pales in comparison to Colin Firth's version of Darcy in the 1996 BBC production and it seems almost unfair to compare the two. So, we won't. Or we'll really, really try not to. The love story is still very sweet and fraught with humor, misunderstanding, a little bit of drama and whole lot of passion. The Lizzie Bennet Diaries may not have the best acting in the world, but Ashley Clements (Lizzie) holds her own and does justice to the classic character. Once I started watching, I got completely wrapped up in the heart of the story. In spite of the fact that I'd read the novel and seen almost every version of P&P ever produced, I still found myself tuning in twice a week for new episodes. And the idea of using a web series to expose new generations to classic literature is fantastic. One can only hope that someone was inspired to pick up Austen's book and get lost in the manners, humor and romance of Pride and Prejudice.


Chris Hardwick's All-Star Celebrity Bowling 

I'm terrible at bowling...really, truly awful. So, why would I want to watch bowling on The Nerdist YouTube channel? Because it's AMAZING, that's why! Chris Hardwick (AMC's Talking Dead) is a borderline professional bowler (his father was an actual pro bowler) who invites celebrity guests to bowl for charity against him and a rotating roster Nerdist team. The odds are usually stacked against the celebrity challengers and they rarely ever pull out a victory. But the show is laugh-out-loud hilarious with celebrity guests from shows like Mad Men, The Walking Dead, Breaking Bad and Doctor Who. Subscribe to the Nerdist Channel for a huge variety of fantastic free content and "Go bowling sometime, you guys!"


My Drunk Kitchen

You're not going to learn how to cook watching this show. It just isn't going to happen. But I don't watch for the cooking tips, I watch for the laughs. The premise is actually quite simple; girl sets up camera, girl gets drunk, girl attempts to cook and sometimes the food is edible. Hannah Hart is adorable, charming and insanely funny as she mixes cocktails and cuisines while dishing up a buffet of delicious puns (see what I did there?). My Drunk Kitchen is my go-to when I'm having a rough day or feeling down. One episode can brighten my day and change my outlook on life. Be sure to subscribe to Hannah's YouTube channel, MyHarto, for more drunk cooking shenanigans!


Noaksey

Meet my friend, Dean, aka Noaksey. Self-proclaimed fool and gamer, Noaksey posts his video game play-throughs on his YouTube channel. From classic games to the newest 3D graphics extravaganzas, watch Noaksey shoot, kick, punch, smack, hack, race, chase, murder and maim his way through every digital 'verse imaginable with his trademark wry sense of humor and a charming British accent to boot! Subscribe to Noaksey's YouTube channel for more game-play antics!


Daily Grace

Grace Helbig is out of her f*cking mind...but I mean that in a good way! Grace has a five-days-a-week vlog on YouTube where she talks about anything and everything that may be on her mind. She speaks at a break-neck pace and is sometimes hard to follow. Watching her show is like watching a beautiful female Tasmanian Devil tear through a boutique full of delicate lacy underwear. She's a whirling dervish of wit, sass and confusion. You just have to step back and wait for the dust to settle. Her quirky sense of humor and seemingly stream-of-consciousness approach to vlogging makes her unique and super-fun to watch in the land of online video-diaries. Subscribe to Grace's YouTube channel for more Daily Grace!


MetaDating

Hosted by pro gamer Sean Plott (known online as Day[9] ) and game designers Sean Bouchard and Bill Graner, MetaDating explores romance and dating in the world of video games. During a live-stream session, the two Seans and Bill play a dating/romance-based game, have a few drinks and try to make the characters in the games fall in love, usually with some pretty hilarious results. My favorite episode has the boys playing a game called Facade. The in-game dialogue and interactions are insanely funny as they interact with a married couple named Tripp and Grace. But they must tread lightly because they can set off a firestorm of an argument and drive the couple to divorce. It is extremely entertaining to watch the boys gleefully ruin the NPC's marriage and then go back for more. There are eight fantastic episodes of MetaDating and Geek and Sundry has not announced plans for another season yet. But my fingers are crossed for more!


Vaginal Fantasies

I love trashy romance novels. The trashier the better. And what could possibly make a trashy romance novel even better? Answer: if it was a PARANORMAL trashy romance novel! And now, finally, there is a book club for me! Hosted by Felicia Day, Bonnie Burton, Veronica Belmont and Kiala Kazabee, Vaginal Fantasies is a regular hangout that happens every third Tuesday of the month and a book club with an enormous community on GoodReads. Ghosts, demons, zombies, succubi and all manner of supernatural creature engage in hot, sweaty monkey love and solve a little bit of mystery or something...I'm not sure what. We're focusing on the sexy time, guys. During the monthly hangouts, we have a few drinks, discuss the book and cast the characters with actors we imagine would fit the part. The discussion is engaging and funny and anything that encourages people to read (especially trashy romance novels) is good in MY book. <--- yeah, that just happened... Subscribe to Geek and Sundry for more Vaginal Fantasies! 


So, those are a few of my favorite online shows. A lot of people use YouTube to watch music videos, cat videos, videos of the latest idiot making a fool of him/herself on the evening news or clips from Saturday Night Live. And that's great. But YouTube also has a whole community of incredibly talented people making amazing original content just because they're passionate about it. And occasionally, if you're lucky, as a viewer you're going to find something you are just as passionate about watching.

I'm sure I'll be posting more amazing stuff that I love in the future. And if you watch something you want to share with others, post it on my Facebook page or in the comments below!

Don't forget to like us on Facebook and follow us on Twitter for all the latest 8-Bit Cook news!

Wednesday, April 3, 2013

Quest 1.8: Chicken Fried Rice!

Welcome back, Apprentices! I hope you enjoyed the Game of Thrones menu from last week! I know it was a bit more challenging but I knew you were up for it. I have faith in you, my little cooking minions! It was a busy weekend with Easter, the season finale of The Walking Dead and the season premiere of Game of Thrones so today, we're going to dial it back a notch and prepare one of my favorite recipes, chicken fried rice! The great thing about this dish is that is easy, delicious and versatile!

Shameless plug: Remember, for more 8-Bit Cook news, join the community on Facebook and like us on Twitter!

On to the quest!


Chicken Fried Rice
Serves 6-8

Ingredients:

1 Chicken Breast
3 Chicken Thighs
1 Medium Onion
5 Medium Carrots
1 Cup Frozen Peas
1 Bay Leaf
2 Cloves Garlic
2 Tbs Vegetable Oil
1/4 Tsp Celery Salt
Salt & Pepper
Soy Sauce
2 Eggs
4 Cups Cooked Rice (white or brown)

Prepare your chicken! Fill a large pot with filtered water. Make sure there is enough water to fully submerge the chicken (6 cups worked for me). Peel and chop 1 carrot, 1/4 of the medium-sized onion and garlic cloves. Add them to the pot with the bay leaf and celery salt. Don't worry too much about how neat your pieces are. You just want large hunks of veggies because as we cook the chicken, we're also making chicken broth! Later, we're going to use that broth to cook the rice! Cover with the lid and put the pot on the stove over medium heat for about 1 hour. Chicken is done when the meat is white and juices run clear when you cut the meat open.


Tip* If you prefer to use all white meat, substitute chicken thighs with 2 more chicken breasts for a total of three chicken breasts.

Remove the cooked chicken from the water and set aside to cool. Discard or compost the cooked veggies.


Cook your rice! Try to skim as much of the stuff out of the chicken broth as possible. If you have a fine sieve, run the broth thru. If not, don't stress, just fish out the big chunks and call it good.

Measure out three cups of chicken broth and transfer to a clean pot. Put the pot on the stove and turn to medium-high heat. Bring the broth to a boil and add 1 1/2 cups dry rice. Cover and lower the heat. Cook for about 15-17 minutes or until broth is absorbed. Be sure you pay attention to the directions on your package of rice. Different types of rice will have different cook times. I used basic white rice for this recipe.


Cooking rice with broth adds a whole new dimension to the flavor. Use chicken, beef or vegetable broth and it will change your life forever....with rice.

Immediately transfer rice to a clean bowl and refrigerate. You need to transfer the rice to a bowl to stop the cooking process. Like pasta, if you leave rice in a hot pot, the heat will continue to break it down and the rice will become soft and mushy. And fried rice works better with cold, firm rice. It's even better if the rice was cooked the day before. Leave it in the refrigerator for about two hours before you start the next stage.


Shred your chicken! Once cooled (safety first!) hold your chicken with one hand and shred the meat with a fork. I will usually use the fork to shred the chicken breasts and my fingers to pull the meat from the thighs. With the thighs, it helps to be able to feel the meat because of all the gristle and fat. I like to separate out the fat and gristle because I am huge on texture and that stuff just grosses me out. Put the shredded meat in a bowl and set aside.


Peel and dice the remaining carrots and onion. Remember to use a clean cutting board and a sharp, clean knife.


In a wok or large skillet, pre-heat 2 tablespoons of vegetable oil. Add carrots and onion and cook until onion is translucent and carrots are fork-tender, stirring frequently. While onion and carrots are cooking, start the next step.


Beat together the two eggs and pour into a skillet. Put on the stove and heat on medium until eggs are done. Do not stir. Just let the eggs cook and solidify. Once cooked, slice the egg and set aside.


Add the chicken to carrot and onion mixture, stir and sauté until hot. Sprinkle lightly with salt & pepper (if desired...just remember, we're adding soy sauce later and that is super-salty) Add rice and stir. Sauté until mixture is hot.


Add 1 cup frozen peas and shredded egg. Stir and sauté until hot and peas are cooked (about 5-7 minutes). Drizzle with soy sauce and stir. I usually add enough soy sauce to darken the mixture just a little bit...about 1 tablespoon does the trick for me. But soy sauce is very much about personal taste. So add a little, taste the rice and go from there.


Plate and enjoy! ...or just grab a fork and eat it straight from the skillet! This is a safe space and we don't judge!


I hope you guys love this recipe as much as I do! Questions or comments? Post them in the comments section! Try the recipe? Post some pictures! I would love to see!

In the coming weeks and months, we'll be tackling some more special menus as we pay tribute to Doctor Who's 50th Anniversary with some special dishes honoring Doctors past and present! We'll also be cookin' it up Cajun style with a full menu for the season 6 premiere of True Blood! So stay tuned!

Points:

+5 Boiling
+5 Dicing
+10 Sautéing